Using ntopng with nProbe
ntopng can be used to visualize traffic data that has been generated or collected by nProbe. Using ntopng with nProbe is convenient in several scenarios, including:
- The visualization of NetFlow/sFlow data originated by routers, switches, and network devices in general. In this scenario, nProbe collects and parse NetFlow/sFlow traffic from the devices, and send the resulting flows to ntopng for the visualization.
- The monitoring of physical network interfaces that are attached to remote systems. In this scenario, ntopng cannot directly monitor network interfaces nor it can see their packets. One or multiple nProbe can be used to capture remote network interfaces traffic and send the resulting flows towards a central ntopng for the analysis and visualization.
The following picture summarizes the two scenarios highlighted above and demonstrates that they can also be combined together.
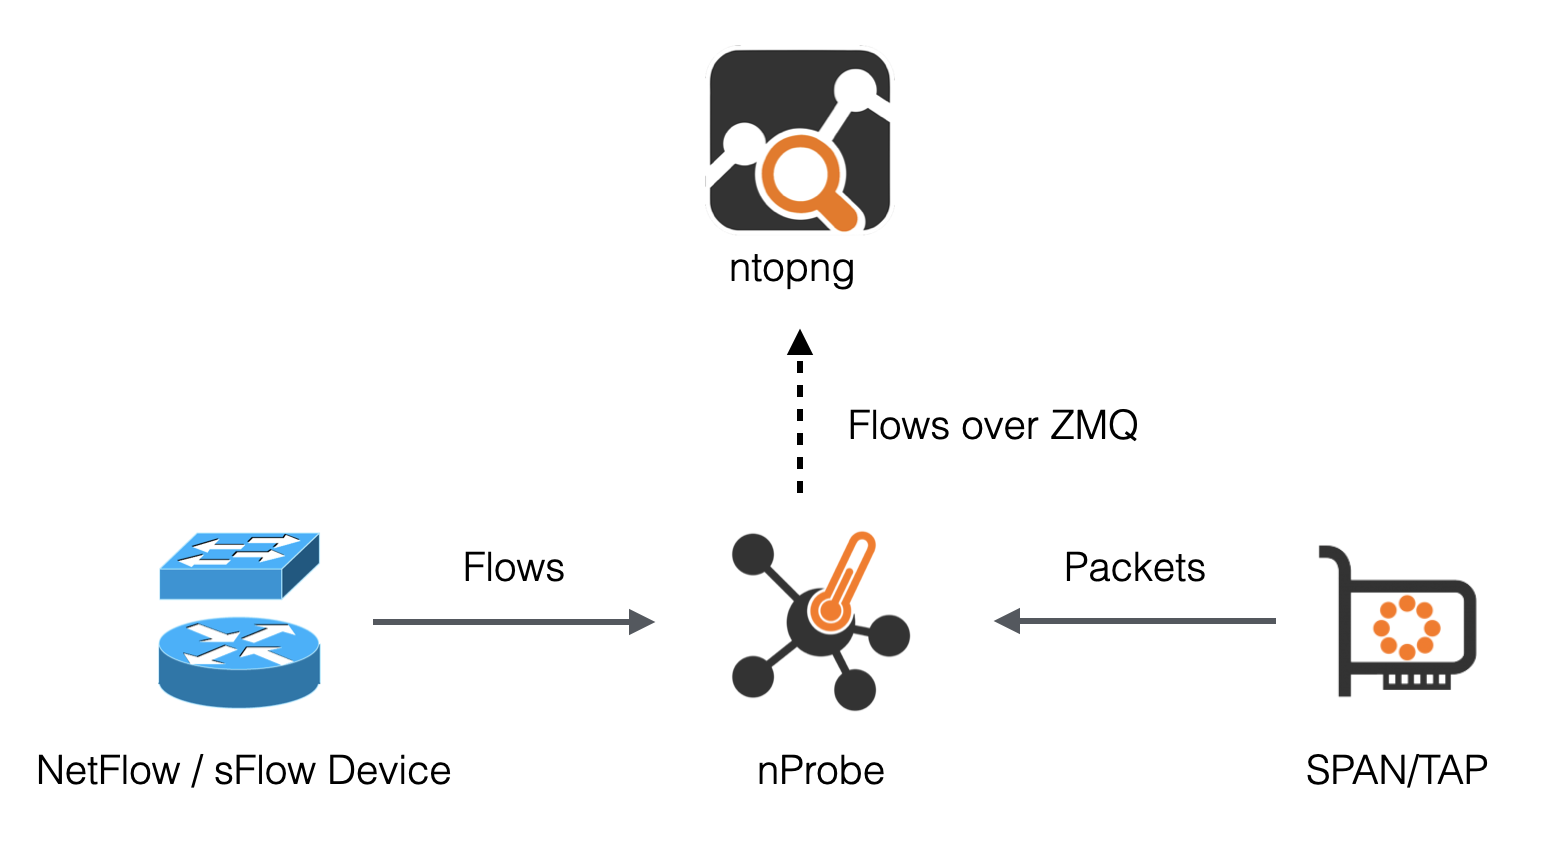
Using nProbe with ntopng
In the picture above, arrows from nProbe to ntopng represent the logical direction of exported flows. In practice:
- The actual connection can either be initiated by ntopng or nProbe as discussed in Using Behind a Firewall.
- nProbe export flows as standard JSON over ZMQ (http://zeromq.org/). The benefits of using JSON over ZMQ are described in detail in the following blog post http://www.ntop.org/nprobe/why-nprobejsonzmq-instead-of-native-sflownetflow-support-in-ntopng/.
Following is a minimum, working, configuration example of nProbe and ntopng to obtain what has been sketched in the picture above. The example assumes both ntopng and nProbe are running on the same (local) host. In case they run on separate machines, the IP address 127.0.0.1 has to be changed with the address of the machine hosting nProbe.
ntop Configuration
ntopng -i tcp://127.0.0.1:5556
nProbe Configuration
nprobe --zmq "tcp://*:5556" -i eth1 -n none -T "@NTOPNG@" # raw packets
nprobe --zmq "tcp://*:5556" -i none -n none --collector-port 2055 -T "@NTOPNG@" # NetFlow/sFlow over UDP on port 2055
Option -T "@NTOPNG@", known as template, tells nprobe the minimum set of fields it has to export in order to ensure interoperability with ntopng. Specifying this option is recommended when using nProbe with ntopng. Other collectors may require different sets of fields in order to work. Templates and exported fields are discussed below.
Exported Flow Fields
One of the benefits of exporting flows in JSON is that it has no fixed format. As a consequence, the set of fields exported from nProbe to ntopng is variable and configurable using an nProbe template. In order to ensure interoperability with ntopng, this template, defined with nprobe option -T, should contain the following minimum set of fields:
%L7_PROTO %IPV4_SRC_ADDR %IPV4_DST_ADDR %L4_SRC_PORT %L4_DST_PORT %IPV6_SRC_ADDR %IPV6_DST_ADDR %IP_PROTOCOL_VERSION %PROTOCOL %IN_BYTES %IN_PKTS %OUT_BYTES %OUT_PKTS %FIRST_SWITCHED %LAST_SWITCHED %SRC_VLAN %FLOW_TO_APPLICATION_ID %FLOW_TO_USER_ID %INITIATOR_GW_IP_ADDR %EXPORTER_IPV4_ADDRESS
Rather that specifying all the fields above one by one, an handy macro @NTOPNG@ can be used as an alias for all the fields. nProbe will automatically expand such macro during startup. Hence, the following two configurations are equivalent:
nprobe --zmq "tcp://*:5556" -i eth1 -n none -T "@NTOPNG@"
nprobe --zmq "tcp://*:5556" -i eth1 -n none -T "%L7_PROTO %IPV4_SRC_ADDR %IPV4_DST_ADDR %L4_SRC_PORT %L4_DST_PORT %IPV6_SRC_ADDR %IPV6_DST_ADDR %IP_PROTOCOL_VERSION %PROTOCOL %IN_BYTES %IN_PKTS %OUT_BYTES %OUT_PKTS %FIRST_SWITCHED %LAST_SWITCHED %SRC_VLAN  %FLOW_TO_APPLICATION_ID %FLOW_TO_USER_ID %INITIATOR_GW_IP_ADDR %EXPORTER_IPV4_ADDRESS"
Additional fields can be combined with the macro @NTOPNG@ to specify extra fields that will be added to the minimum set. For example, one can add source and destination MACs as:
nprobe --zmq "tcp://*:5556" -i eth1 -n none -T "@NTOPNG@ %IN_SRC_MAC %OUT_DST_MAC"
Using Behind a Firewall
In the remainder of this section it is shown how to connect nProbe and ntopng in presence of a NAT or firewalls. Indeed, the examples given above might not have worked well in case there was a firewall or a NAT between nProbe and ntopng. Following it is shown an exhaustive list of all the possible scenarios that may involve firewalls or NATs, and the configuration that has to be used to always ensure connectivity between nProbe and ntopng.
nProbe and ntopng on the same private network (firewall protected)
In this scenario, the firewall does not create any trouble to ZMQ communications and the normal configurations described above can be used.
nProbe on a public network/IP, ntopng on a private network/IP protected by a firewall
In this case the ZMQ paradigm works well as ntopng connects to nProbe and the normal configurations highlighted above can be used.
nProbe on a private network/IP, ntopng on a public network/IP protected by a firewall
In this case the ZMQ paradigm does not work as the firewall prevents ntopng (connection initiator) to connect to nProbe. In this case it is necessary to revert the ZMQ paradigm by swapping the roles of nProbe and ntopng. Suppose nProbe runs on host 192.168.1.100 and ntopng on host 46.101.x.y. In this scenario it is necessary to start the applications as follows
nprobe --zmq-probe-mode --zmq "tcp://46.101.x.y:5556" -i eth1 -n none
ntopng -i "tcp://*:5556c"
Note the two options:
--zmq-probe-modetells nProbe to initiate a connection to46.101.x.y-i "tcp://*:5556c"tells ntopng to act as a collector (notice the smallc) and to listen for incoming connections.
In essence the roles of nProbe and ntopng have been reverted so they behave as NetFlow/IPFIX probes do. Only the roles have been reverted. Everything else will continue to work normally and the flows will still go from nProbe to ntopng.