As traffic rate increases, it is important to tune packet processing in order to avoid drops and thus educe visibility. This post will show you a few tricks for improving the overall performance and better exploit modern multicore systems.
The Problem
ntopng packet processing performance depends on the number of ingress pps (packets per second) as well the number of flows/hosts being monitored and number of enabled behavioural checks. With ntopng you can expect to process (your mileage varies according to the CPU/system you are using) a few (< 5) Mpps (million pps). So if you need to enable more traffic what can you do? Read below.
Maximising ntopng Packet Processing
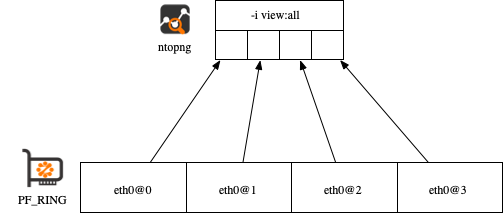
In order to improve the processing performance it is necessary to configure multiple ntopng network interfaces thus partitioning the workload across multiple interfaces. The easiest way to split ingress packets across network interfaces is by means of RSS (Receive Side Scaling) that can be configured as explained here. In essence RSS enables hardware-based ingress traffic balancing across multiple virtual network queues. Basically enabling RSS with a value of 4, the (physical) network adapter is partitioned into 4 (logical) virtual network adapters, each receiving a (coherent, i.e. the RX and TX directions of a flow are sent to the same virtual adapter) subset of the traffic. PF_RING identifies RSS queues with <network interface>@<RSS queueId>, so ntopng needs to be configured as follows:
- ntopng -i -i eth0@1 -i eth0@2 -i eth0@3 -i view:all

The view interface allows you too see from a single interface the traffic that is processed by the individual sub-interfaces. Using this technique you can almost scale linearly… as long as you have enough cores available. Note that a faster version of the above example is based on ZC, and in this case you need to change the command line into:
- ntopng -i zc:eth0@0 -i zc:eth0@1 -i zc:eth0@2 -i zc:eth0@3 -i view:all
Maximising ntopng Flow Collection
Now that you have learnt the trick we can do the same with flow collection, by enabling multiple ntopng collection interfaces. Collecting flows is necessary if flows are generated by a flow-based devices such as a sFlow-enabled switch or NetFlow-based router. Instead using flow as an intermediate format is required for using nProbe/nProbe Cento as packet preprocessor, this to maximise the performance. You can expect nProbe to process about 10 Mpps (using RSS) and nProbe Cento to go above 100 Mpps (or 100 Gbit line rate).
nProbe
- ntopng -i tcp://127.0.0.1:1234 -i tcp://127.0.0.1:1235 -i tcp://127.0.0.1:1236 -i tcp://127.0.0.1:1237 -i view:all
- nprobe -i mlx:mlx5_0@0 –zmq tcp://127.0.0.1:1234
- nprobe -i mlx:mlx5_0@1 –zmq tcp://127.0.0.1:1235
- nprobe -i mlx:mlx5_0@2 –zmq tcp://127.0.0.1:1236
- nprobe -i mlx:mlx5_0@3 –zmq tcp://127.0.0.1:1237
nProbe Cento
- ntopng -i tcp://127.0.0.1:5556c -i tcp://127.0.0.1:5557c -i view:all
- cento -i mlx:mlx5_0@[0-3] –zmq “tcp://127.0.0.1:5556,tcp://127.0.0.1:5557”
With the above solution, cento exports flows on two different ZMQ connections (you can define more) and ntopng can collect flows on two ZMQ interfaces. The view interface will then merge the flow coming from the two collector interfaces.
If you want to read more about the topic of this post, please see the following posts about:
Enjoy !
