Settings
The Runtime settings can be configured using the dropdown gear menu in the top toolbar.

The Dropdown Settings Menu in the Top Toolbar
Manage Users
Manage Users menu gives access to ntopng users administration. Ntopng is a multi-user system that handles multiple simultaneous active sessions. Ntopng users can have the role of Administrators or standard users.

The Manage Users Settings Page
Password and other preferences can be set during user creation and changed later on by clicking on the Manage button. User preferences include:
- The user role (Administrator or Not Privileged)
- Allowed interface
- Allowed networks in traffic visualization
- Permission to download live traffic and PCAPs (honoring the interface and networks restrictions)
Preferences
Preferences menu entry enables the user to change runtime configurations. There are two types of settings (changeable by clicking the view at the end of the preferences menu) : Expert View and Simple View. The Expert View has all the configurable preferences, instead the Simple View only has the basic preferences.
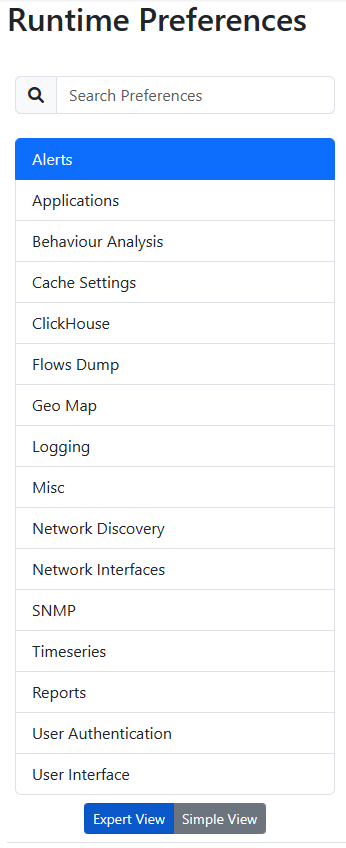
Preferences List
A thorough help is reported below every preference directly into ntopng web GUI.
Change ntopng Index Page
It is possible to change the ntopng index page (e.g., instead of displaying the ‘Traffic Dashboard’ when opening ntopng, display the ‘SNMP’ page), by jumping to the ‘Settings’ and ‘Preferences’ tab. From here jump to the ‘User Interface’ section and modify the ‘Index Page’ with the ntopng page desired to be displayed as an index.
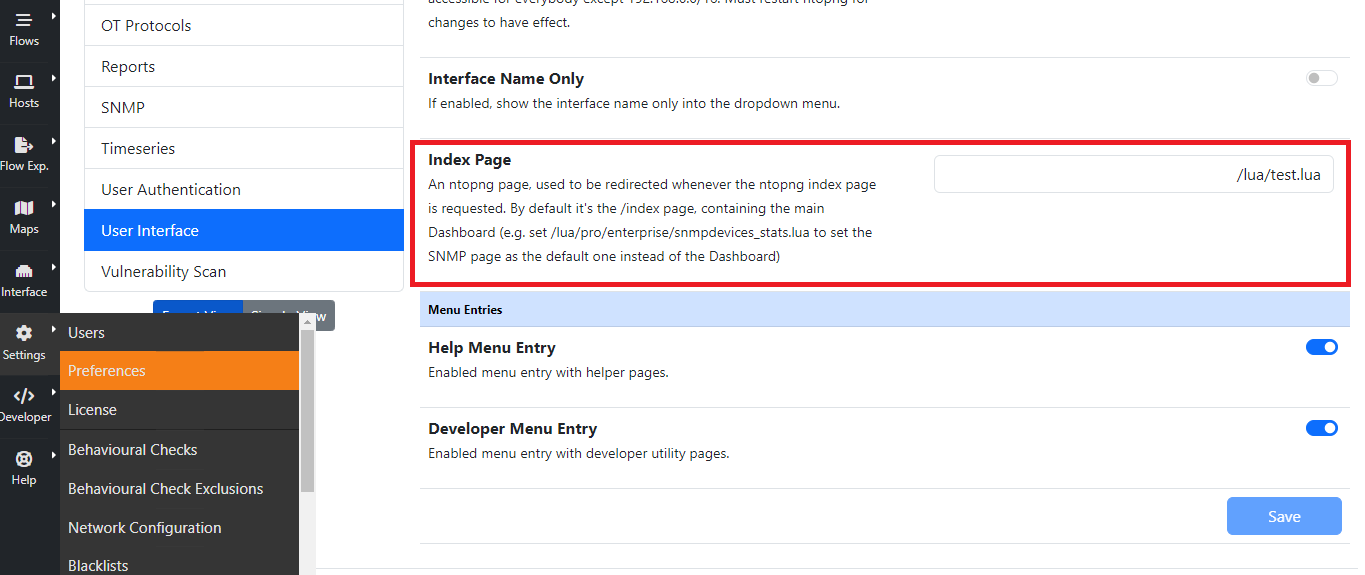
For instance, by setting the ‘Index Page’ to ‘/lua/pro/enterprise/snmpdevices_stats.lua’, when opening ntopng, the default page displayed is going to be the ‘SNMP’ one.
Data Retention
Data retention is configurable from the preferences.
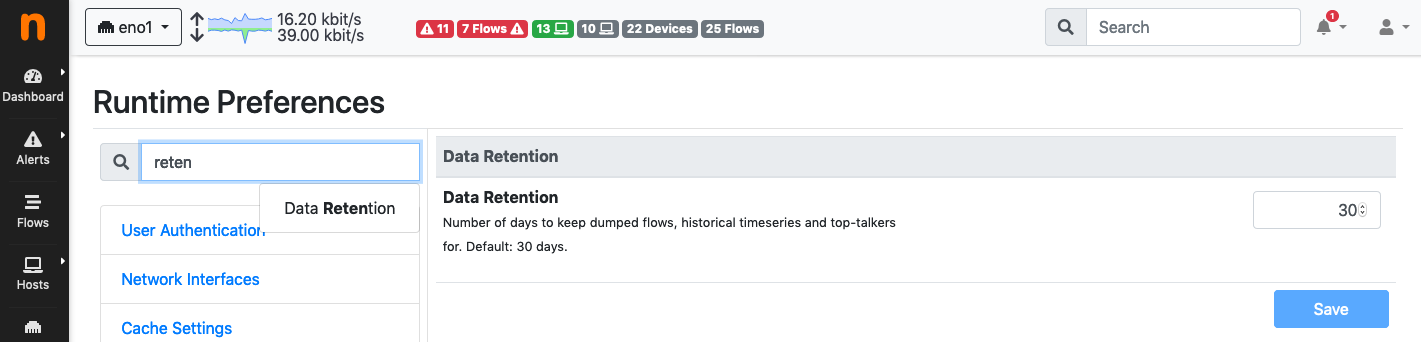
Data Retention Configuration
Data retention is expressed in days and it affects:
- Top Talkers stored in sqlite
- Timeseries
- Historical flows
Note
When using RRDs for timeseries, changing the data retention only affects new RRDs created after the change.
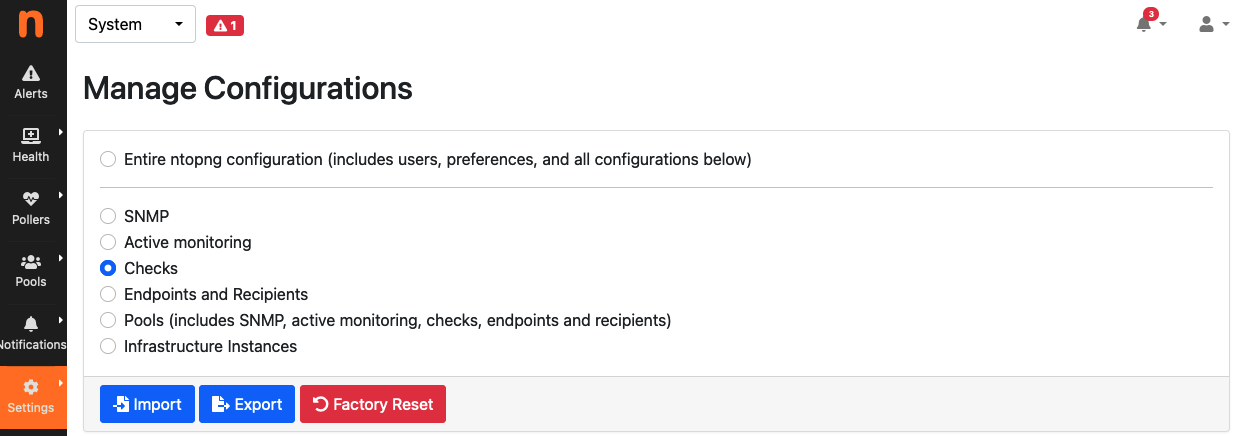
Manage Configuration
ntopng provides the ability to backup its configuration, in order to be able to restore it in case of system failures and reinstallations, or to clone it to other systems requiring the very same configuration (e.g. in a cluster or in a high-availability deployment), saving a lot of time for manually copying all the settings.
Through the web GUI it is possible to export selected configurations, including:
- SNMP configuration
- Active Monitoring configuration
- Checks configuration
- Alerts Endpoints and Recipients
- All Pools (this will also include all the previous items, as this depends on them)
or export the entire ntopng configuration, which includes Users and Preferences in addition to all the above items. In both cases, a small JSON file containing the configuration is generated.
It is also possible to import back a configuration which as been exported before, providing the JSON file. The configuration items contained in the imported configuration will be added to those already present in the current ntopng configuration (e.g. endpoint already configured in ntopng, if any, will not be deleted when importing additional endpoints).
Resetting the configuration to factory defaults is also possible. This is also useful when importing a configuration and preserving the old one is not required nor wanted (e.g. when adding a set of recipients and endpoints without preserving those already present).
All this is available from the Settings -> Configurations menu, as shown in the below picture.
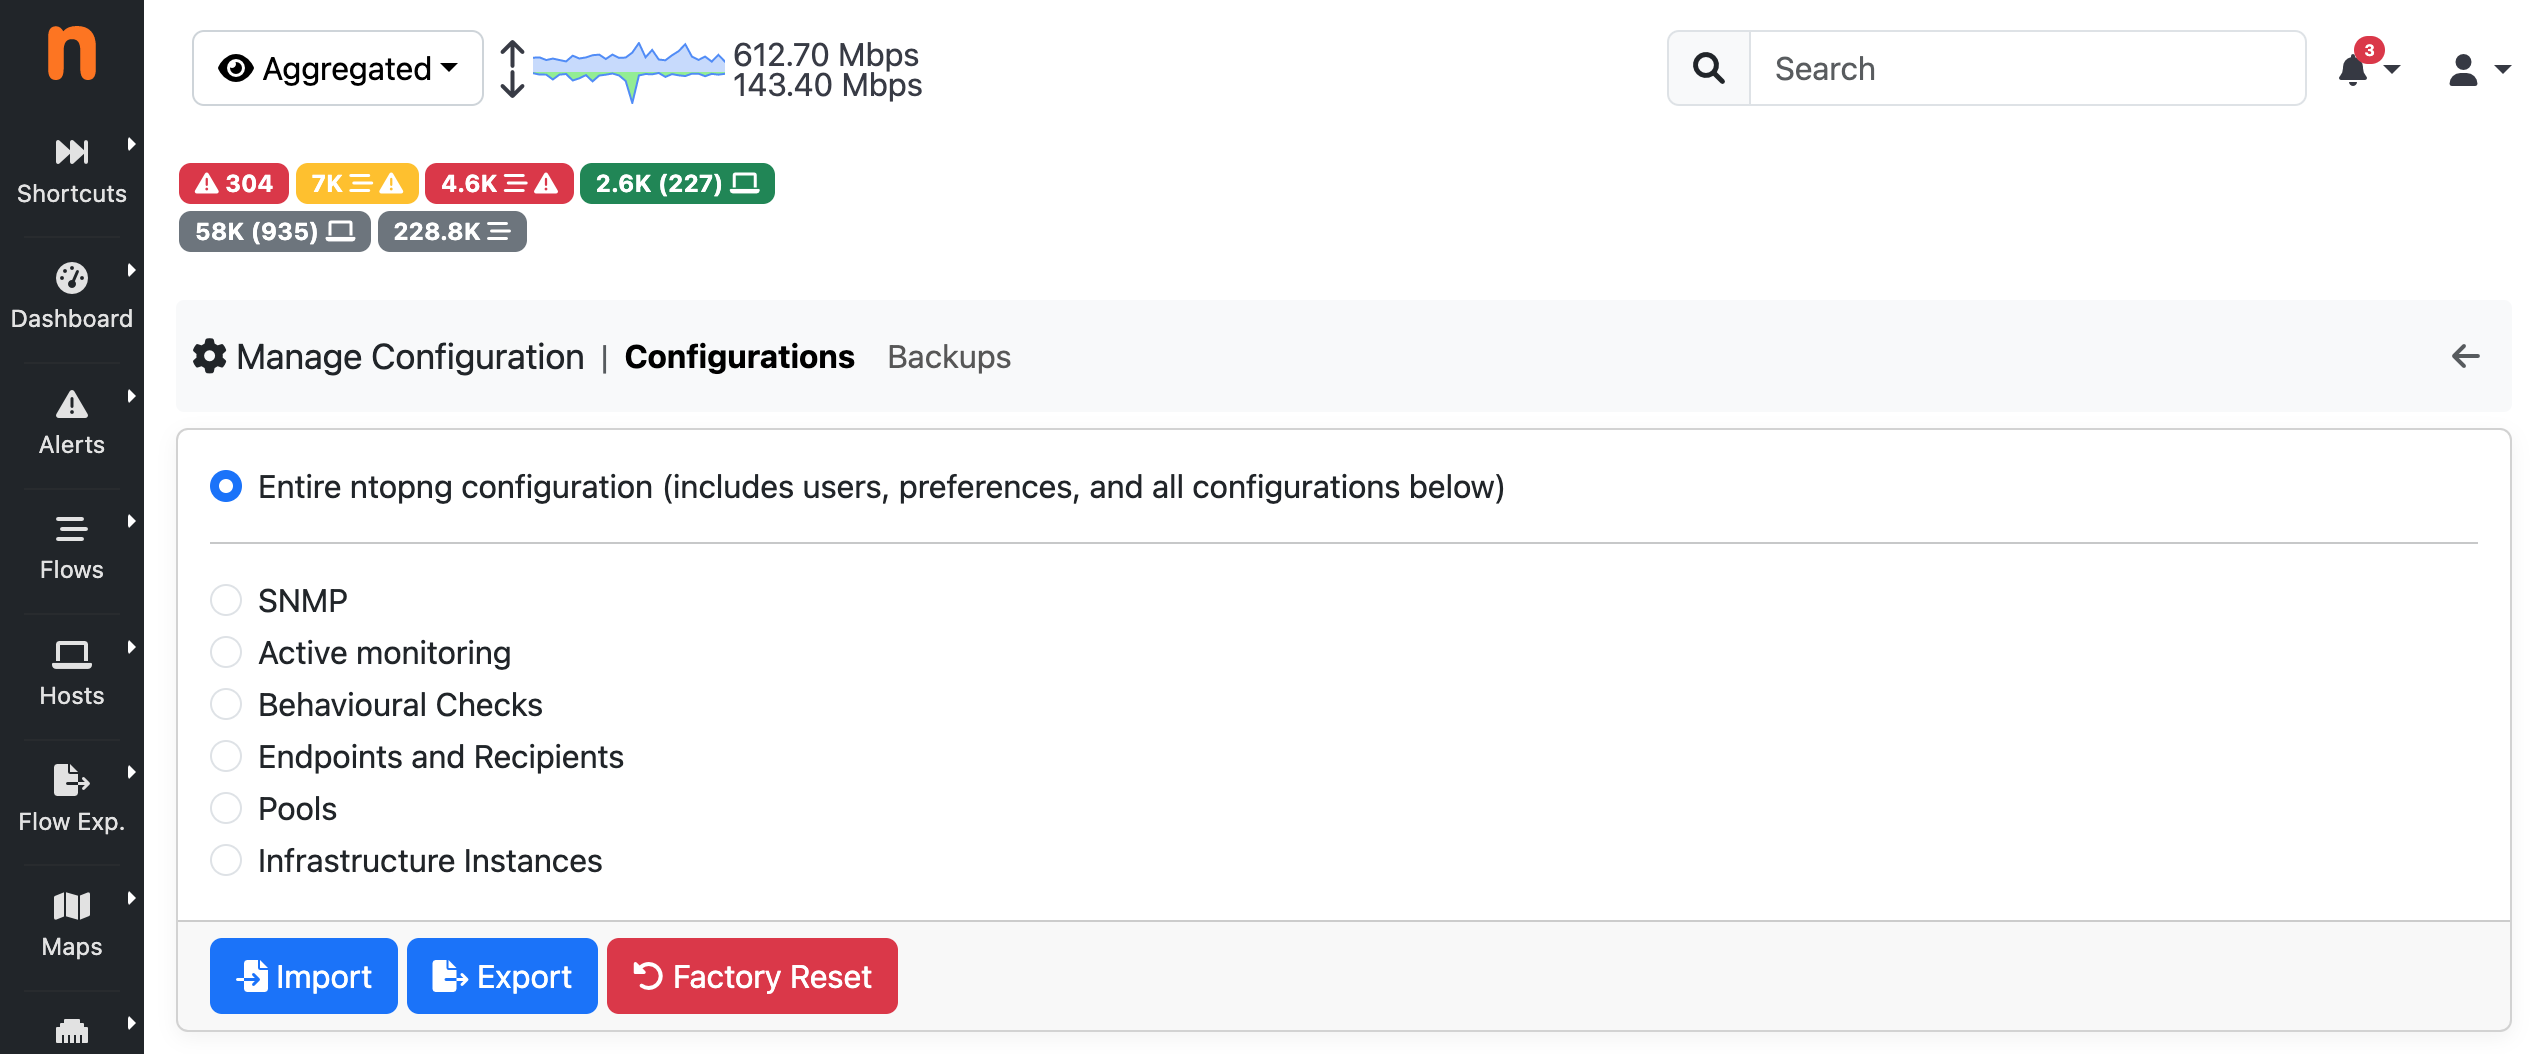
The Manage Configurations Page
Every night, ntopng automatically creates a backup of the whole application configuration. No backup is created if the configuration didn’t change since the previous day. Currently the last 7 backups are stored and older ones are automatically discarded. You can download a backup using the Download menu under the Actions colums. This backup can be restored using the Import button on the main configuration page.
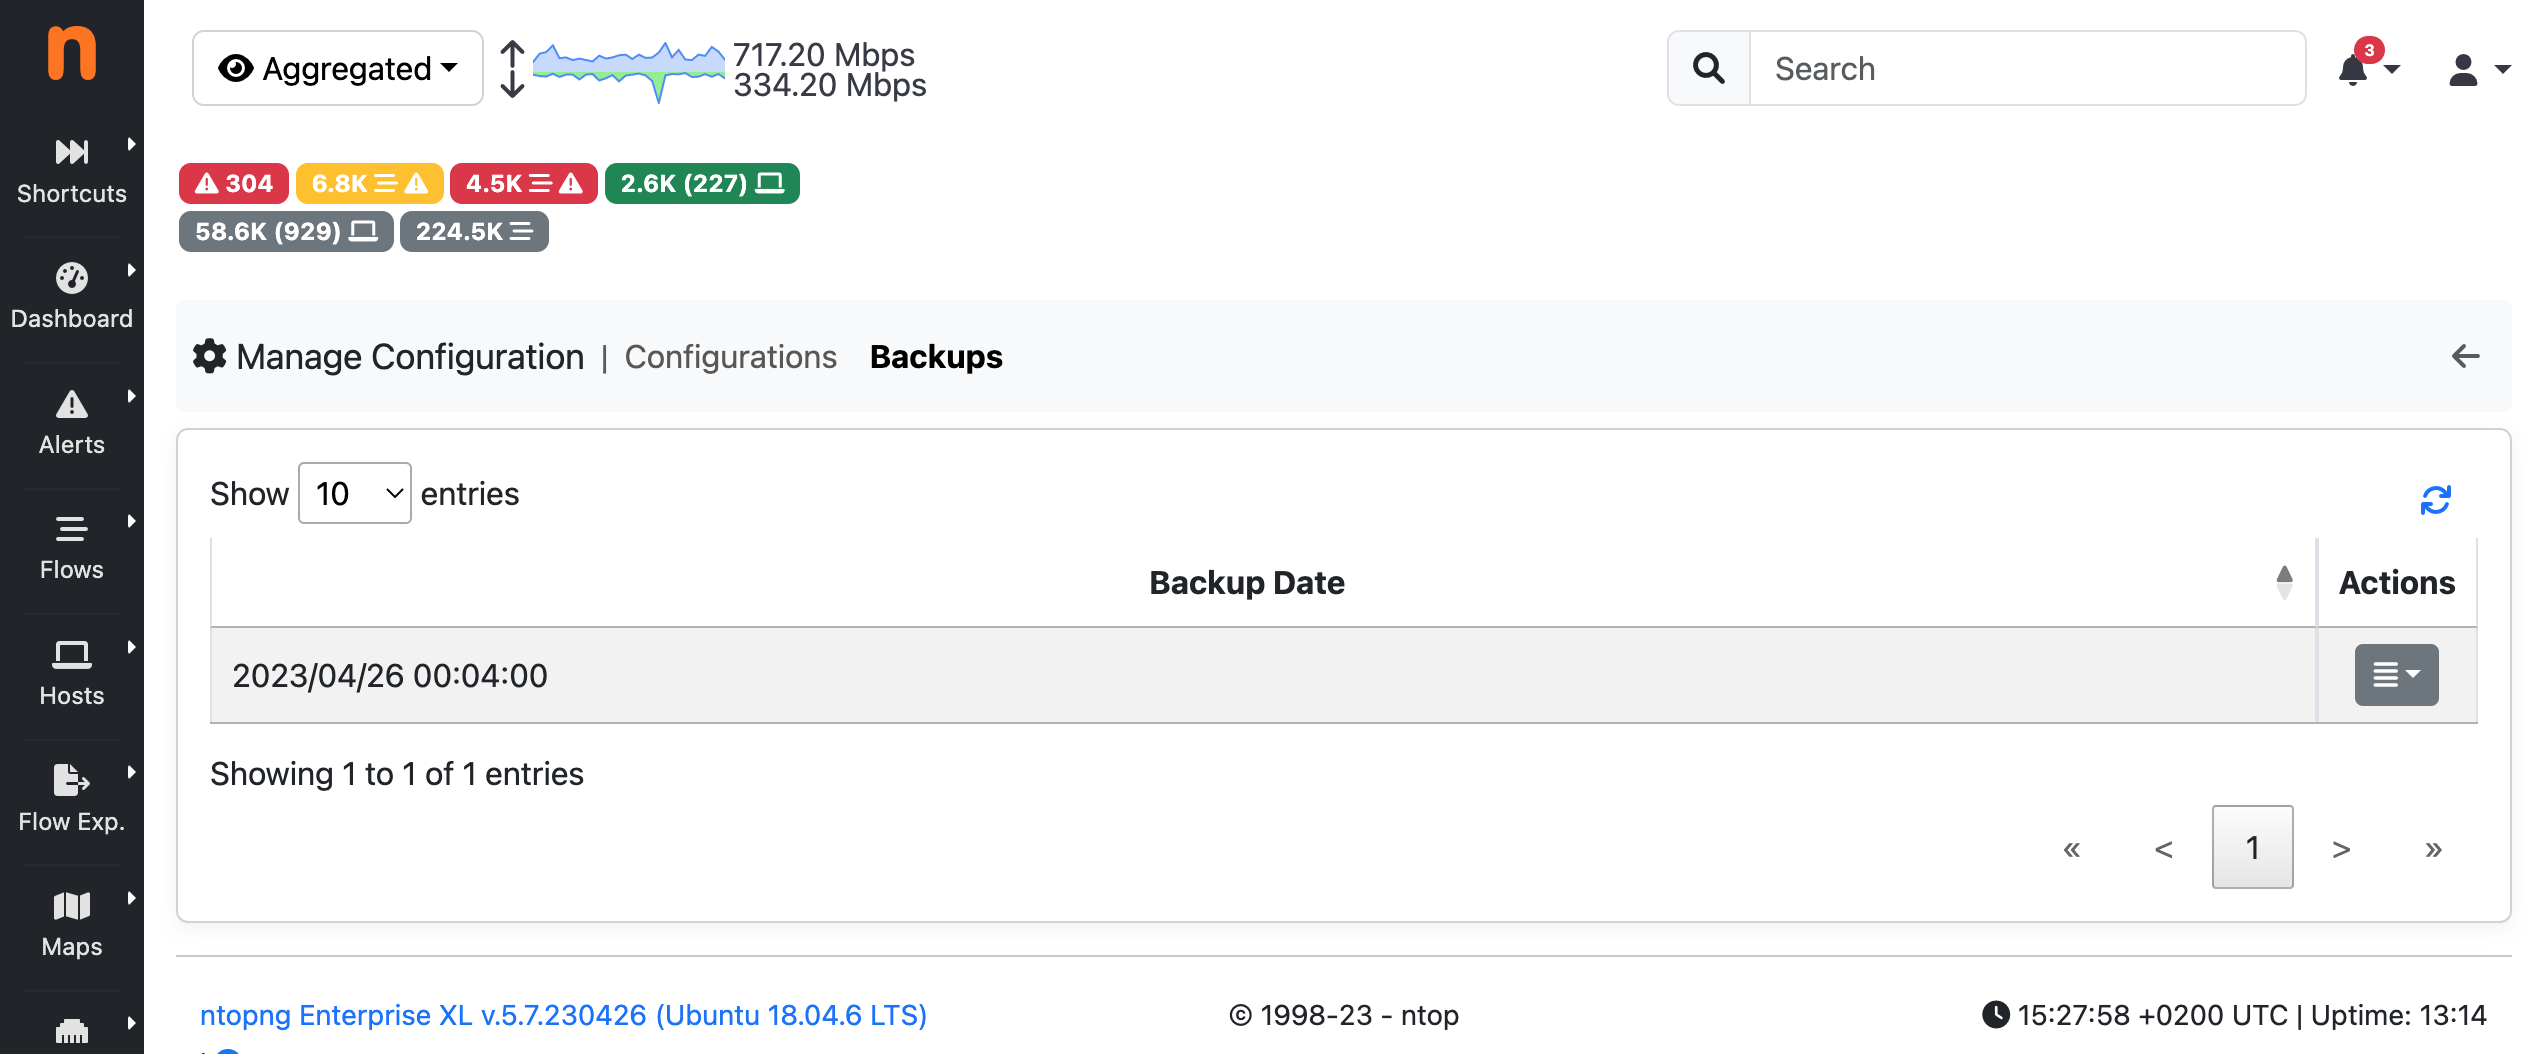
The Configurations Backup Page
Import/Export via API
Configuration can also be imported and exported programmatically via API. Following is an example that uses the REST API to export and then import the global ntopng configuration.
To export the global ntopng configuration in a local JSON file all_config.json from an host office, user admin (identified with password admin) can call the following endpoint
$ curl -u admin:admin1 "http://office:3000/lua/rest/v2/export/all/config.lua?download=1" > all_config.json
To import the configuration, the contents of all_config.json must be POST-ed as the value of a string JSON to the following endpoint:
$ curl -uadmin:admin1 -H "Content-Type: application/x-www-form-urlencoded" --data-urlencode "JSON=`cat all_config.json`" "http://office:3000/lua/rest/v2/import/all/config.lua"
A successful POST is confirmed by the following message:
{"rc":0,"rc_str":"OK","rc_str_hr":"Success","rsp":[]}
A restart of ntopng is required after the import of the global configuration.
Manage Data
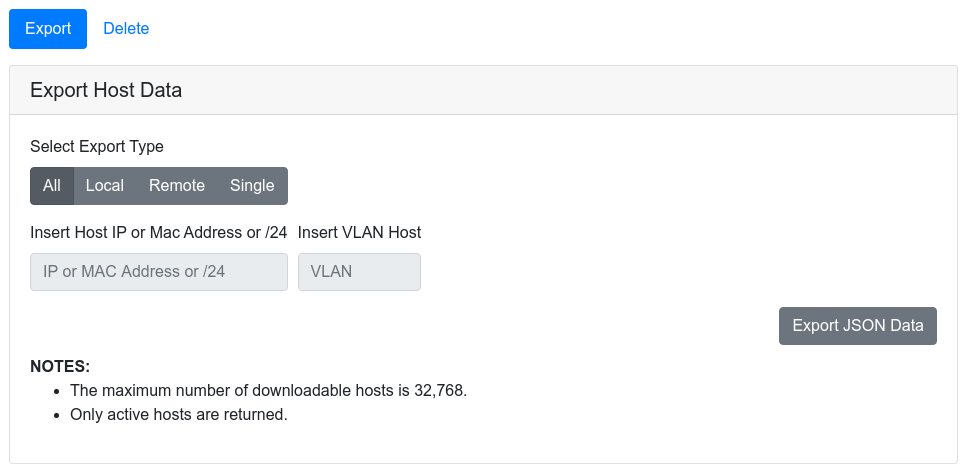
Through the manage data page it is possible to export or delete the interface data.
The Export Data Page
It is possible to choose between the following options:
- Export all the hosts data
- Export all the local hosts data
- Export all the remote hosts data
- Export a specific host data, by specifying its IP or MAC address and optionally a VLAN
The JSON data can be downloaded and easily analyzed.
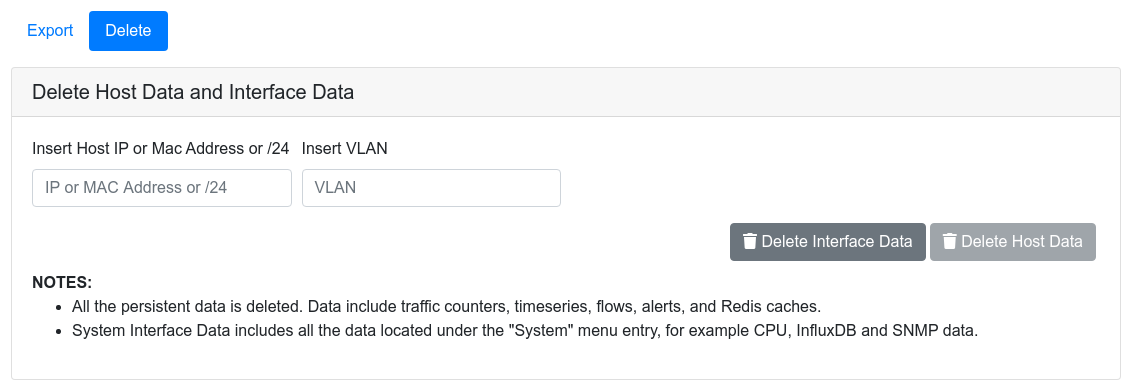
The Delete Data Page
The Delete tab is similar to the export tab. It provides a convenient way to delete all the data associated to a particular host or group of hosts (via a /24 network CIDR). It is also possible to delete all the data associated to the active interface.
The Manage Data page is accessible when a non system interface is selected. On the system interface, the delete data functionality can be directly accessed via the Settings menu. In this case, it is possible to:
- Delete the system interface data
- Delete the inactive interfaces data. This can be very useful to free some disk space for old interfaces.
Checks
Checks process network elements and perform actions such as triggering alerts. Creating checks is discussed in detail in Checks. This section describes how users scripts can be enabled and disabled, configured, and applied to network elements such as hosts and flows.
Checks can be configured from any interface, from the menu Settings->Checks.
Checks Settings
Configuring a check means:
- Choosing the network elements the script is going to be executed for.
- Enabling/disabling it.
- Setting its configuration values.
Editing Checks
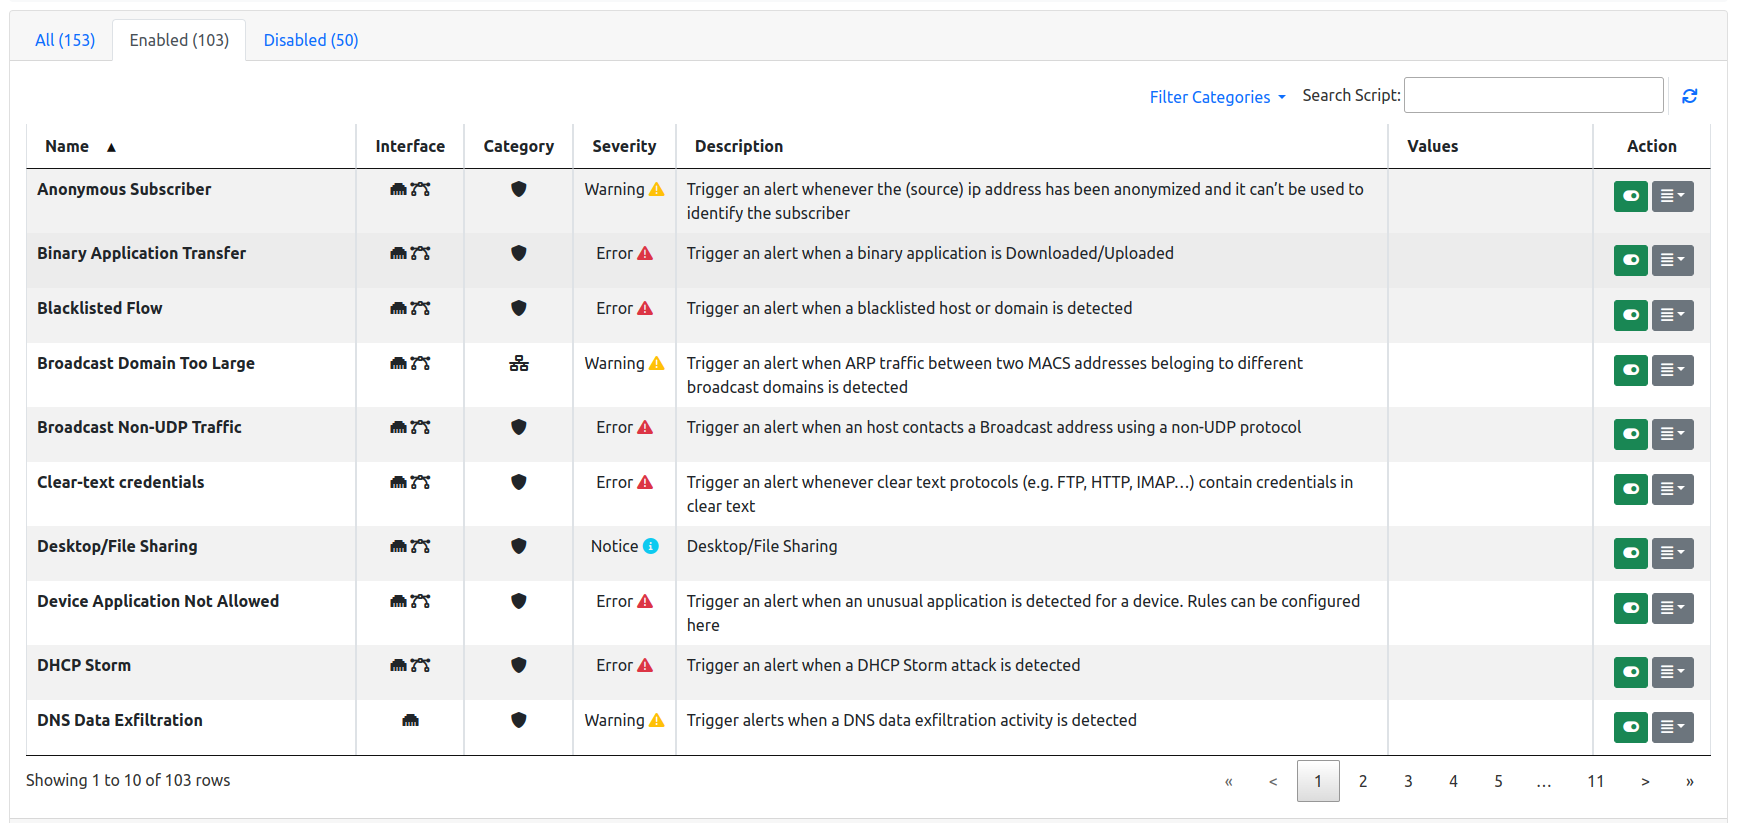
Checks can be edited for any of the configurable network elements. The edit page shows three tabs, namely All, Enabled, and Disabled to give immediate access to the whole list of checks, or to limit the view to only those that are enabled or disabled.
A check can be enabled or disabled by clicking the corresponding button under the Actions column. Certain checks can also have their values configured. In this case, an extra button Edit becomes available under the Actions column.
Resetting, Importing and Exporting Configured Checks
All existing check configurations can be imported and exported in bulk, to ease backup, restore, and replication across multiple machines. To perform these actions, visit the System Interface -> Settings -> Manage Configurations and select Checks
Checks Import, Export and Reset
Applications and Categories
Category
Traditionally nDPI was used by ntopng to detect flows L7 protocol. With the advent of more and more protocols, speaking about single protocols is often too difficult. Users usually are not interested in the specific protocol but rather on a whole group of protocols. For example, it’s easier to reason about VPN traffic as a whole rather than a particular VPN implementation.
For these reasons, nDPI (and ntopng) has been extended to provide a logical grouping of protocols, called Categories. With Categories it’s possible, for example, to get an idea of the network traffic of a host:
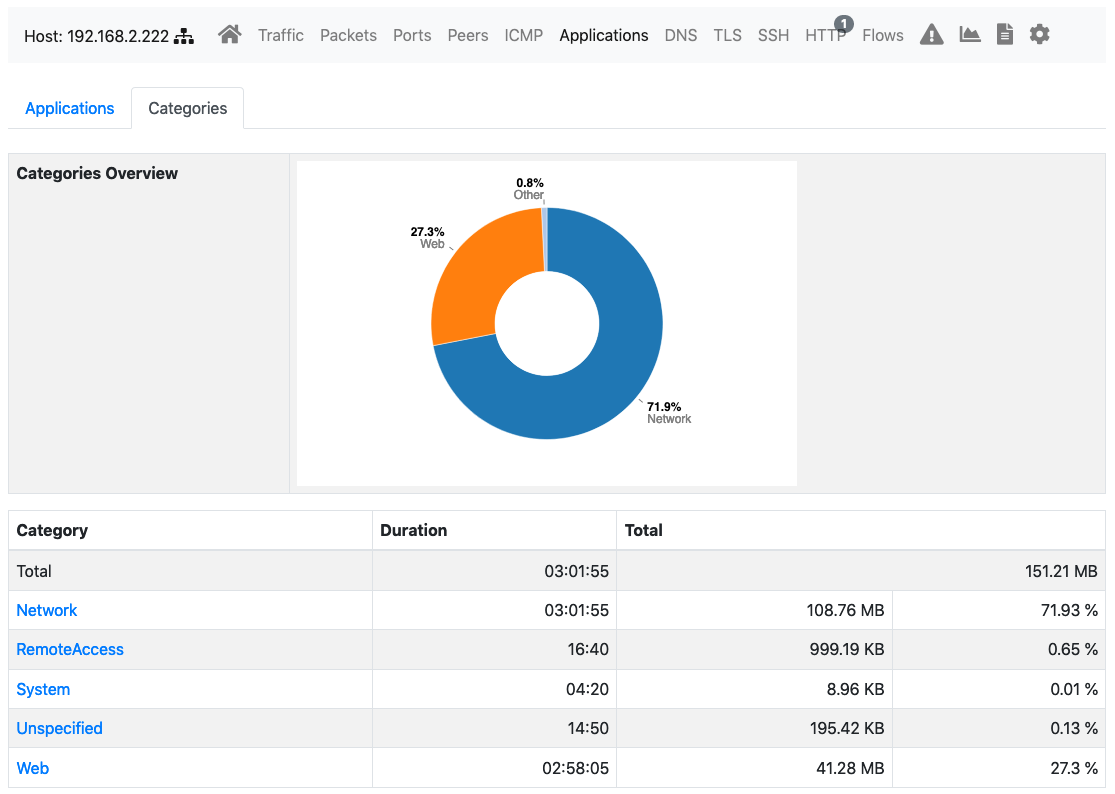
Host Category Overview
Some use cases solved by the Categories include:
- Block all advertisement sites (nEdge)
- Trigger an alert whenever my employees access a malware site (ntopng, whereas in nEdge there is the ability to block this traffic)
- Prevent clients from accessing the WiFi sites of competitors as they are using them for comparing prices (nEdge)
Custom Applications
In the Applications tab it’s possible to configure the category associated associated with a particular application.
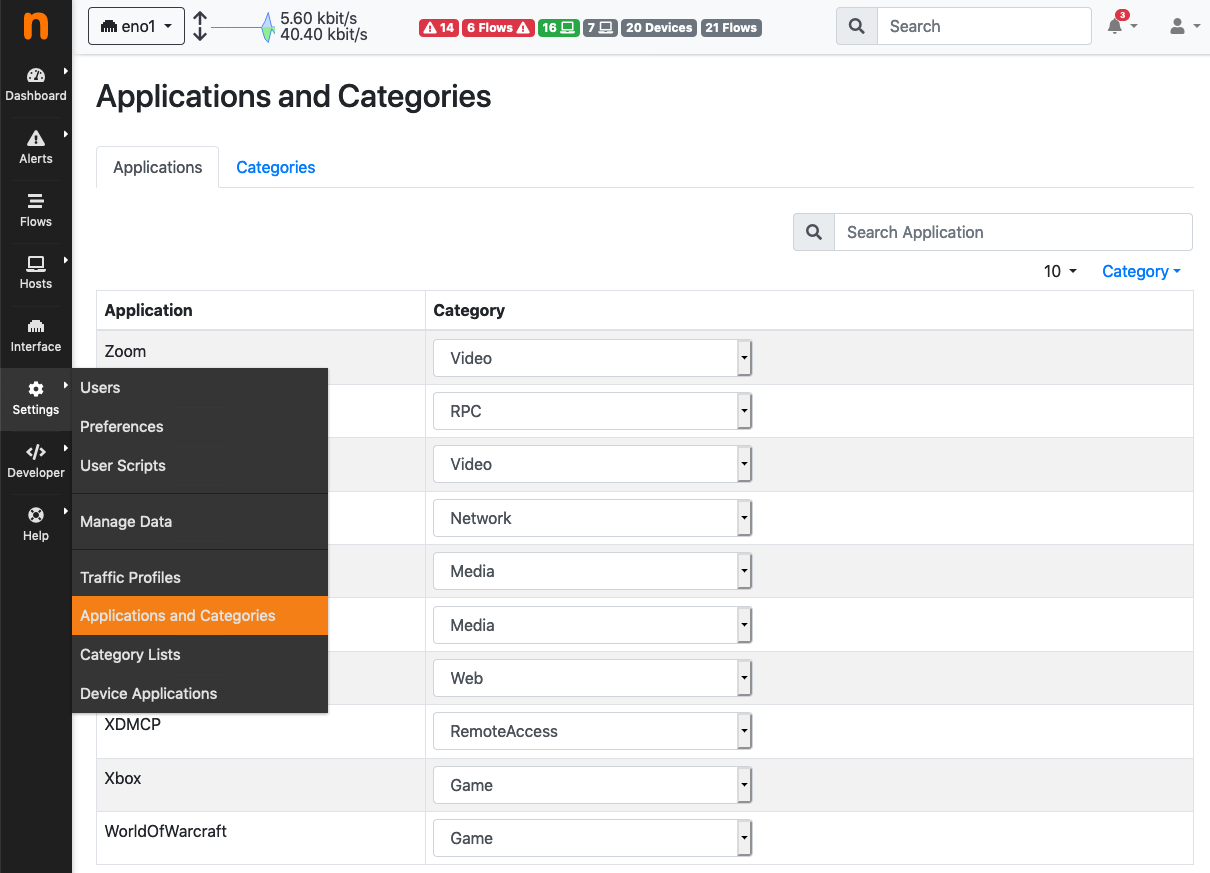
Applications Configuration Page
ntopng determines the application of a flow via some rules into nDPI. However, some additional rules can be specified by the user via the –ndpi-protocols|-p <file> option. The file has the following format:
# host:"<value>",host:"<value>",.....@<subproto>
host:"googlesyndacation.com"@Google
host:"venere.com"@Venere
An example for this configuration file is available here.
Ntopng also supports editing such file from the GUI. In order to do so, it’s still necessary to use the above option to point to a protos file located into a directory where ntopng has the permission to read and write. In practice, in order to enable this feature, ntopng should be started with the –ndpi-protocols=/var/lib/ntopng/protos.txt option. If you already have a protos file, move it to /var/lib/ntopng/protos.txt and run
sudo chown ntopng:ntopng /var/lib/ntopng/protos.txt
to prepare it to be used by ntopng.
After this feature is enabled, by clicking on the “Edit Rules” button it will be possible edit an application rules directly from the GUI and add new protocols. It’s important to note that rules and new protocols will only be created and applied after a restart of ntopng.
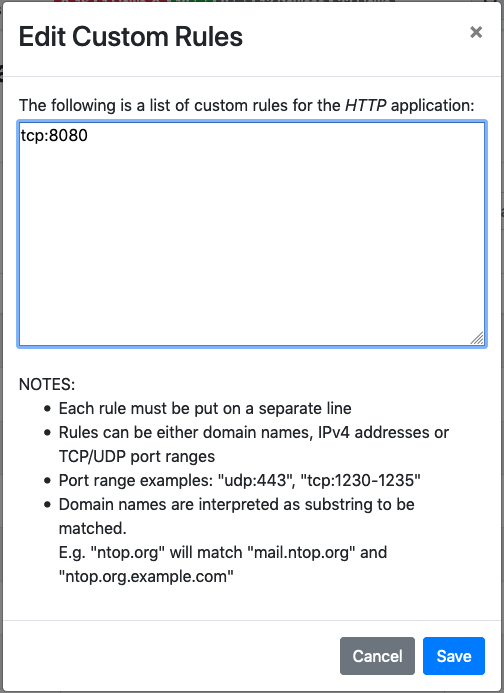
Editing Application Rules
For example, the tcp:8080 rule in the example above tells ntopng to treat all the TCP traffic on port 8080 as HTTP. In order to delete a user defined protocol it’s necessary to clear all of its rules and save the changes. The protocol will be deleted after a restart of ntopng.
Custom Categories
As shown above, ntopng already assigns a default category to the known L7 protocols. Nevertheless, it’s also possible for the user to specify a list of additional hosts to be included into a particular category. ntopng provides 5 empty “custom categories” dedicated to this task, but users are also free to modify the other categories.
The custom category hosts can be specified via some host-based rules. The host-based rules will be used to perform substring matching on some of the flow information:
- Client/Server IP
- DNS query
- Host SNI
- HTTP Host
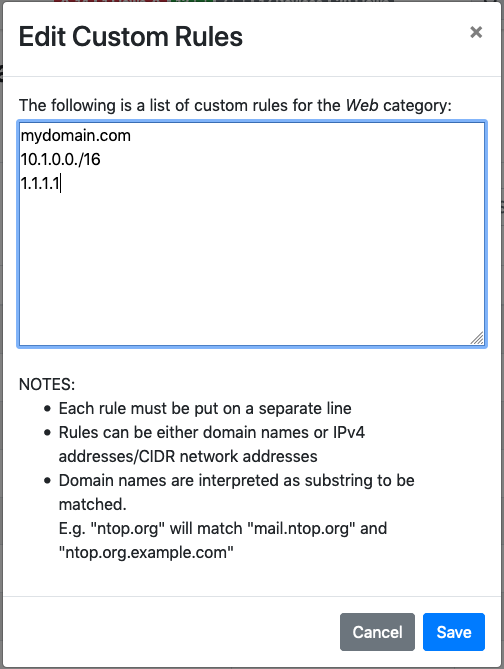
If a match is found, the flow category will be set to the corresponding matching category. These rules can be configured from the Categories tab.
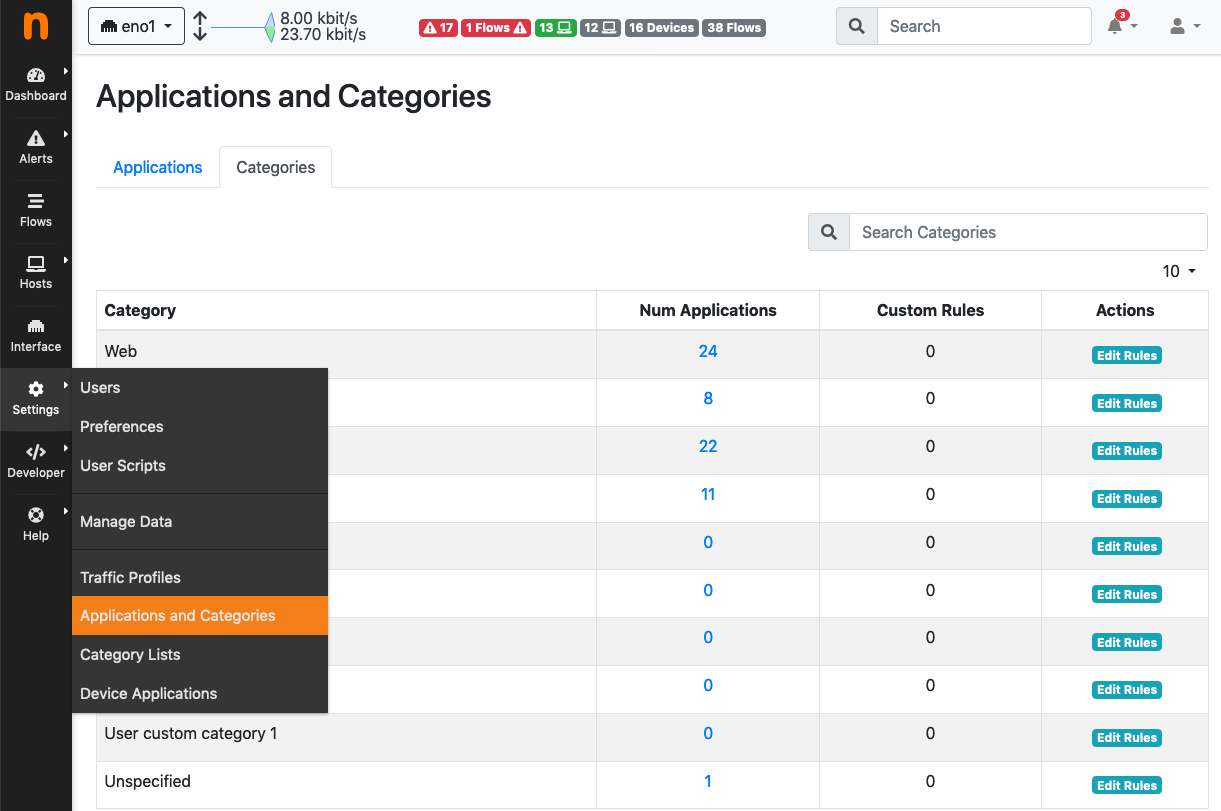
By clicking “Edit Rules” it’s possible to define some rules to match hosts and associate them to the category.
Edit Category Hosts
The picture above shows some custom hosts defined for the Web category.
Note
host matching based on IP addresses is currently limited to IPv4 flows.
ntopng also supports external lists to define custom categories, loaded from text file (local) or online services (e.g. emergingthreats for the Malware category). Since lists are also used to raise alerts (e.g. for hosts in the Malware or Mining category), you may need to add exceptions to those lists, whitelisting selected hosts. This is possible adding an host to the list, prepending “!” to the IP/hostname (e.g. !1.2.3.4).
Adding a Rule from a Flow
From the flow details page, it’s possible to click on the plus sign beside the flow SNI, DNS or HTTP host to easily create a rule to associate such host to a particular application or category.

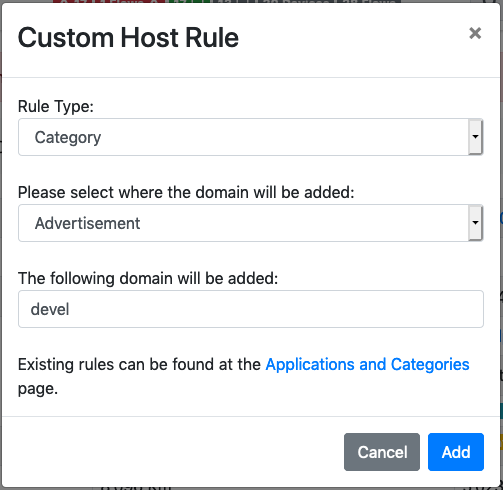
Add Host Rule