nScrub is a software-based DDoS mitigation system based on PF_RING ZC, able to operate at 10 Gbit full-rate (or multi 10 Gbit distributing the load across multiple modules) using commodity hardware, making it affordable in terms of price and deployment.
nScrub is easy to configure even for beginners and companies with no experience with DDoS mitigation, it can be implemented as bump in the wire (i.e. no BGP or traffic tunneling necessary) or as router for on-demand traffic diversion.
In this post we will go through the installation steps for installing and configuring nScrub as bump in the wire, which is really straightforward. We will also learn how to create a basic configuration for protecting a web server.
1. Installation
Installation packages are provided at packages.ntop.org, please follow the steps on the website for configuring the repository. In this post we will go through the configuration steps for Ubuntu 16, however it is possible to do the same also on other Ubuntu/CentOS/Debian systems. As first step we need to install at least the pfring, pfring-drivers-zc-dkms and nscrub packages:
apt-get install pfring pfring-drivers-zc-dkms nscrub
2. Configuration
Assuming that we want to run nScrub on a 4 core CPU, using an Intel ixgbe-based card, we need to configure the driver with 4 RSS queues for distributing the load across all the CPU cores:
mkdir -p /etc/pf_ring/zc/ixgbe
touch /etc/pf_ring/zc/ixgbe/ixgbe.start
echo “RSS=4,4” > /etc/pf_ring/zc/ixgbe/ixgbe.conf
Hugepages need to be configured, as they are used for memory allocation. The number of hugepages required mainly depends on the number of interface queues and the MTU. For instance if you configure 4 RSS queues with an MTU of 1500 bytes 1024 hugepages are enough, with 12 RSS queues you need to setup 2048 hugepages.
echo “node=0 hugepagenumber=1024” > /etc/pf_ring/hugepages.conf
Now you are ready to load pf_ring:
systemctl enable pf_ring
systemctl start pf_ring
As next step you need to configure the nScrub service, creating the /etc/nscrub/nscrub.conf configuration file. Assuming that you want to run nScrub as bump in the wire, creating a transparent bridge between two interfaces eth1 and eth2, the configuration file is quite simple:
touch /etc/nscrub/nscrub.start
cat /etc/nscrub/nscrub.conf
--wan-interface=zc:eth1
--lan-interface=zc:eth2
--log-path=/var/tmp/nscrub.log
Before starting the nScrub service, we also need to create a SSL certificate, which is needed to enable the RESTful API over HTTPs for configuring the mitigation policies. This is also needed to be able to use nscrub-cli, the CLI tool with auto-completion, which is using the RESTful API as communication channel. Please note that the HTTP server listens on localhost only by default for security reasons, you can bind it to a different IP adding –http-address
openssl req -new -x509 -sha1 -extensions v3_ca -nodes -days 365 -out cert.pem
cat privkey.pem cert.pem > /usr/share/nscrub/ssl/ssl-cert.pem
Now we are ready to run the nScrub service:
systemctl start nscrub
3. Mitigation Policies Configuration
Now the nScrub service is up and running, it’s time to configure traffic mitigation for a target server or subnet. This should be done creating a “target”, which is a nScrub internal instance (nScrub is multi-tenant!), and configuring protection policies based on the target service. Targets and protection policies can be modified at runtime using the RESTful API or the nscrub-cli tool.
If you are running the nScrub service for the first time, using the default credentials, all you need to do is to run nscrub-cli with no arguments, and you get a command prompt.
nscrub-cli
localhost:8880>
Now you are ready to issue commands, you can start typing ‘help’ for the full list.
In order to create a simple configuration for protecting a web server, first of all we need to create a target, providing a unique name and an IP or subnet in CIDR format for our server or subnet to protect.
add target my_web_server 192.168.1.0/24
We can also specify the service type (a few options are available) in order to help nScrub understanding how to behave (if you are not sure just skip this setting):
target my_web_server type web
At this point we can setup our actual protection policies for this target.
Each target has a few protection profiles, which is based on the traffic source. Protection profiles are default, black, white, gray. The ‘default’ profile applies to all unknown source IPs, while the other profiles (black, white, gray) apply to the corresponding lists based on source IPs. IPs can be manually added to those lists (e.g. we can blacklist a subnet adding it to the black list, or avoid any mitigation for selected subnets adding them to the white list), and can be automatically added by nScrub to those lists based on the configured protection algorithms.
It is a common practice to just set the “drop all” policy to the black profile:
target my_web_server profile black all drop enable
And set the “accept all” policy to the white profile:
target my_web_server profile white all accept enable
All the actual protection policies for unknown sources go to the ‘default’ profile. It’s a common practice to configure this profile to drop traffic by default, unless it is recognized as legitimate traffic:
target my_web_server profile default default drop
For a web server we probably want to drop all UDP traffic:
target my_web_server profile default udp drop enable
Exception made for DNS, that should be able to work on UDP if we have a server that should be able to answer to requests. We probably want to forward all requests up to a certain rate (pps):
target my_web_server profile default dns request threshold 1000
In case that threshold is reached, we want to check all requests and forward only legitimate ones. We can do this setting the DNS check method:
target my_web_server profile default dns request check_method forcetcp
What about TCP? nScrub has multiple active algorithms for checking TCP sessions, and make sure that a only legitimate connections reach the destination server. Those algorithms can be enabled setting the TCP check method, for instance to RFC:
target my_web_server profile default tcp syn check_method rfc
Now you are ready to test the mitigation, running attacks towards the destination server.
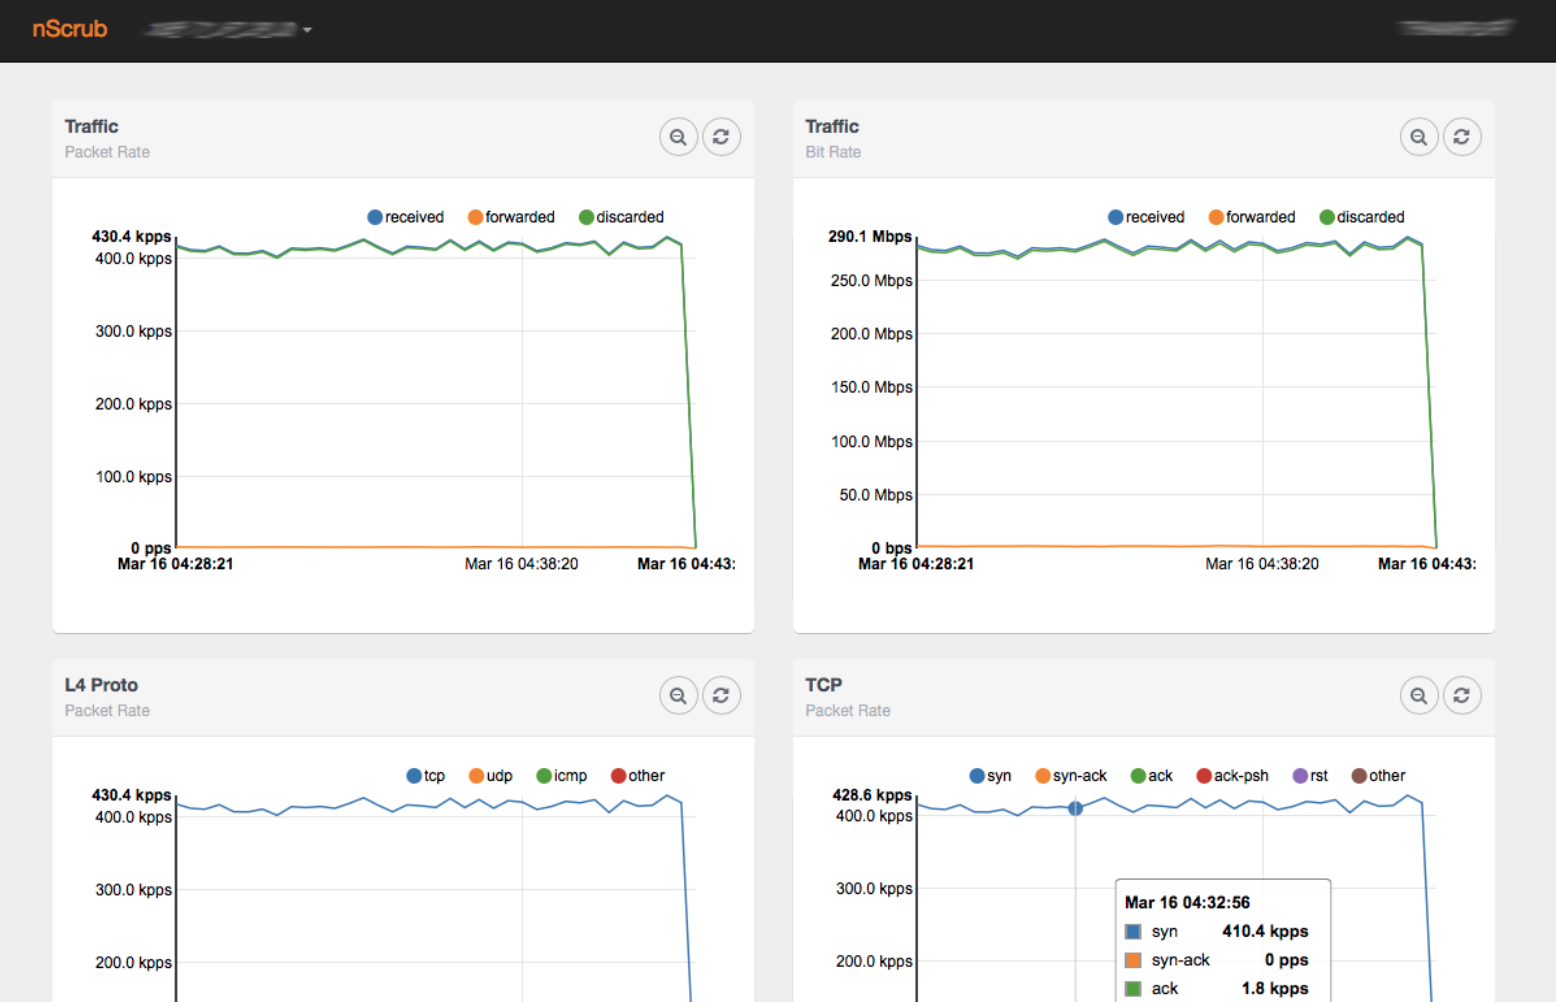
It is possible to check live stats running ‘stats’ in the nscrub-cli prompt or using a browser to access the web gui at http://<host>:8880/monitor.html
Enjoy!