We have been receiving several inquiries from pfSense users who would love to complement the classical firewall-style pfSense features with the inline Layer-7-based traffic policing offered by nEdge. Being able place pfSense and nEdge side by side allows to overcome the common belief which sees the bad guys on the Internet and the good guys on the Local Area Network (LAN). Bad guys are on the Internet and this is true. Period. However, bad guys are also on the LAN, especially today in the Bring-Your-Own-Device (BYOD) era. Think to infected personal computes, vulnerable IoT devices (video surveillance cameras, for example), or compromised smartphones, just to name a few. nEdge allows to enforce Layer-7 policies to prevent LAN devices, being them compromised or not, from doing Tor, using unsafe or unwanted DNS servers, or performing unencrypted plain HTTP traffic, just to give a bunch of examples.
Unfortunately, creating this synergy is not that easy as nEdge has not been ported to FreeBSD and, consequently, to pfSense. Indeed, nEdge heavily relies on certain functionalities provided by Linux kernels and kernel modules. Specifically, such functionalities are mostly offered by the Netfilter framework and by its corresponding userspace utilities such as conntrack, iptables and ebtables. This strong coupling between Linux and nEdge makes it actually unfeasible to work on a FreeBSD port as it would basically mean to rewrite the majority of the code to use FreeBSD utilities such as ipfw.
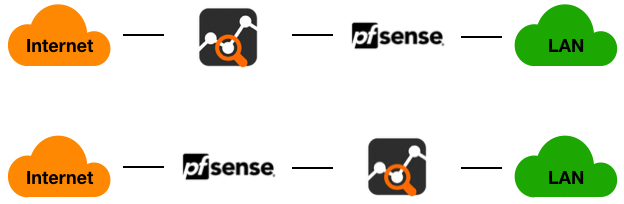
Being it virtually unfeasible to port nEdge to FreeBSD, we would like to briefly discuss how to setup nEdge to make it work in close cooperation with pfSense. Typically, pfSense firewalls are deployed between the Internet and the Local Area Network.

nEdge, in the configuration above, can be placed between the Internet and pfSense, or between pfSense and the LAN. You can choose to leave pfSense directly exposed to the Internet (for example if you want it to perform the first checks and cleanups on the traffic) or you can choose nEdge to be exposed to the Internet, to let pfSense receive Internet traffic which has already been cleaned at the Layer-7.
The easiest way to setup nEdge is to use its bridge mode. In bridge mode, nEdge acts as a transparent bridge which enforces Layer-7 policies and cleans the traffic from unwanted applications or devices which are jeopardizing the network. This mode is described in detail here.
nEdge can be run on small low end devices such as PC Engines apu2 system boards, ZOTAC Mini PCs and fully-fledged computers, always with a minimum of 2 network interfaces to actually bridge the traffic between the LAN and the WAN interface.
nEdge interfaces should be connected as follows:
- When nEdge is placed between the Internet and pfSense
- The nEdge WAN interface should be connected to the Internet and;
- the nEdge LAN interface should be connected to the pfSense WAN interface, previously connected to the Internet.
- When nEdge is placed between pfSense and the LAN
- The nEdge WAN interface should be connected to the pfSense LAN interface and;
- The nEdge LAN interface should be connected to the LAN.
In both cases, you are guaranteed that the traffic will go through the nEdge before reaching the Internet or the clients.
If you are interested in knowing more about the nEdge, feel free to drop us an email, check out the official documentation, or have a look ad the introductory YouTube video.