Today we’ll discuss the ntopng integration with Checkmk, a popular open source infrastructure monitoring tool to which ntopng adds traffic visibility.
If IT infrastructure monitoring and network usage monitoring would see each other on Tinder, they would both for sure swipe right and match. Bringing the big picture perspective of IT infrastructure monitoring together with the in-depth information from network usage monitoring is thus a logical step. That’s why ntop and tribe29, the developers of the IT monitoring solution Checkmk partnered and jointly built a seamless integration of both tools.
The integration makes the data of talkers and listeners detected by ntopng directly available in Checkmk. It adds the network flow information from ntopng to the respective hosts in Checkmk, so all data is available in one solution with several dashboards and graphing options. You will be able to find the root cause of problems faster and with less effort. The step-by-step guide below will lead you through the installation.
IT monitoring tools provide insights into servers, network devices, applications, containers and many other systems and alert you when systems are not working as expected. They analyze metrics of hardware components, e.g. sensors such as CPU, RAM, disk usage, the operating system and applications. In case you want to get a better picture of the health and performance of a system after seeing it in ntopng, you can look for it in your IT infrastructure monitoring to gain more holistic insights.
But, you still would have to jump between ntopng and your IT infrastructure monitoring tool. By leveraging the REST API of ntopng, the integration into Checkmk puts an end to that. It takes the network flow information from ntopng and allocates it to hosts in the Checkmk monitoring. You have the information gathered by Checkmk combined with the most important traffic information from ntopng – all in one solution.
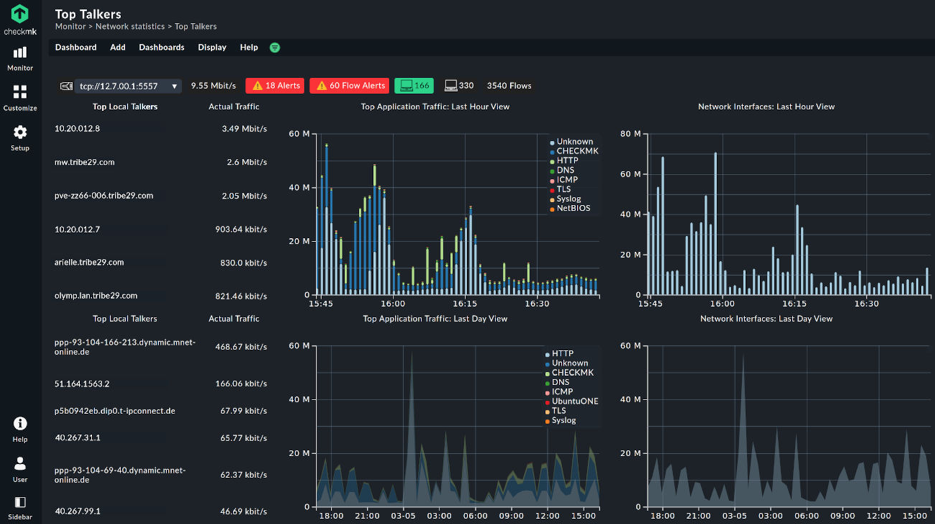
There are several use cases and, thus, the integration offers several views and dashboards in Checkmk. You can analyze hosts, applications or protocols that are communicating with each and identify possible bottlenecks or anomalies. You can identify ‘top talkers’ and ‘top listeners’ in your network, for example, or see the network usage per host and other details. Also, Checkmk can import notifications from ntopng, so you can combine them with your infrastructure alerting.
Setting up the ntop Checkmk integration
Using the integration is fairly simple, but make sure you have the right versions of Checkmk and ntopng up and running. The integration only works with ntopng in a Professional or Enterprise version 4.2 or higher, because the REST API V1 that Checkmk and ntopng use to communicate is only supported from ntopng version 4.2 onwards. The ntopng integration is a payable add-on for the Checkmk Enterprise Edition and you need to use Checkmk version 2.0 or higher. If you just want to try Checkmk, there is a free trial of the Checkmk Enterprise Edition, which includes all features, but will be limited to 25 hosts after 30 days.
Preparation: Check and prepare ntopng parameters for Checkmk
Checkmk needs a user account in ntopng to access the data. You can limit the access given to Checkmk by using a ntopng user with limited access privileges. Depending on your ntopng environment, you might have some network interfaces that you do not want to share with Checkmk.
This tutorial uses the simplest option, which is using a ntopng user with admin access that gives Checkmk full access to all interfaces. In this example, the user is called ‘mhirschvogel’. You can still limit the access for different Checkmk users later in Checkmk. Besides a ntopng user, you need to know the host name and the TCP port of your ntopng server. The server hosting Checkmk must be able to reach your ntopng server, as well. If all that is given, switch to your Checkmk site and log into the user interface.
Step 1: Set up your ntopng user in Checkmk
- Open your Checkmk site and click on Setup -> General -> Global settings.
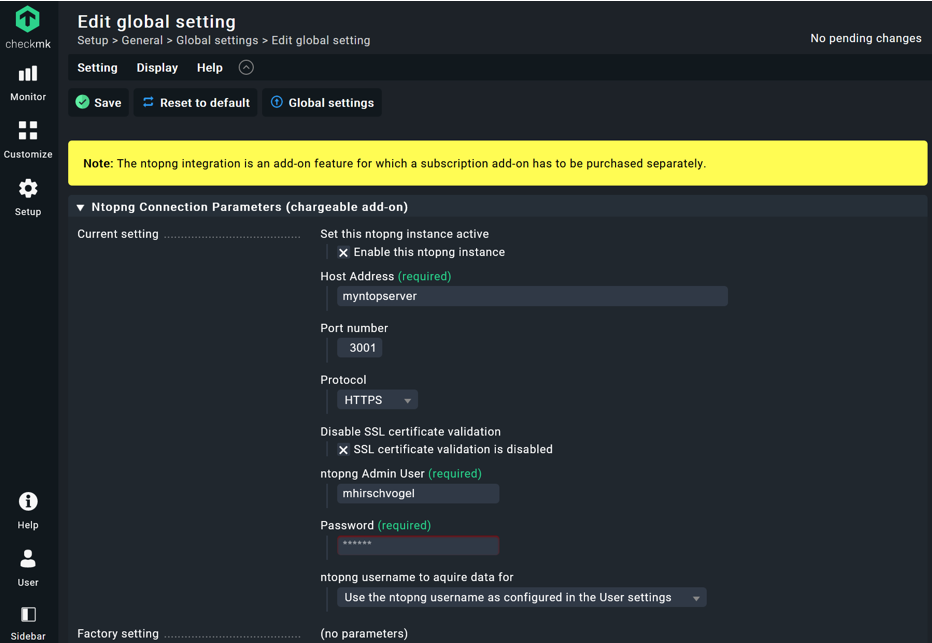
- Click on the ‘Ntopng (chargeable add-on)’ and then click on ‘Ntopng Connection Parameters (chargeable add-on)’.
- Add the necessary parameters:
- ‘Host address’ is the host name of your ntop server. The name must be DNS resolvable. If you just add the IP address of your ntop server you cannot use TLS, because your certificate will be invalid.
- ‘Port number’ is the TCP port over which ntopng can be reached. The port is specified when ntopng is started. The default is 3000 without TLS, change it to 3001 if you use TLS.
- ‘Protocol’: For security reasons, HTTPS is of course preferable over HTTP. If you use a self-signed certificate, you need to check the box to disable the SSL validation.
- Under ‘User account for authentication’ add the user account of the ntopng user you would like to use to get the data from ntopng. As mentioned, this account is called ‘mhirschvogel’ in this case.
- Under ‘ntopng username acquire data for’ I have to use the option ‘use the ntopng username as configured in the user settings’ and adjust the Checkmk user settings in the next step. Because my Checkmk user account are just my initials ‘mh’, I cannot use the same usernames for Checkmk and ntopng: ntopng has stricter naming conventions, ‘mh’ would be too short. If you actually are using identical usernames in Checkmk and ntopng, you can use the option ‘Use the Checkmk username as ntopng username’.
- The settings for me look like this:
Step 2: Add ntopng username to your Checkmk user
If you decide to use Checkmk and ntopng accounts with different names, you need to add the ntopng username for the Checkmk user you are using. If you went for identical names in the step before, you can skip this step.
- To edit the user settings, go to Setup -> Users and select the properties of the Checkmk user that you are using for the integration (in my case user ‘mh’) by clicking on the pencil icon.
- Add the ntopng name in the last line under account ‘identity’. If you cannot see the field ‘ntopng Username’ to do so, you probably did not select the option ‘use the ntopng username as configured in the user settings’ under ‘ntopng username acquire data for’ before. You need to go one step back and change that.
- Add the name of your ntopng user, in my case ‘mhirschvogel’.
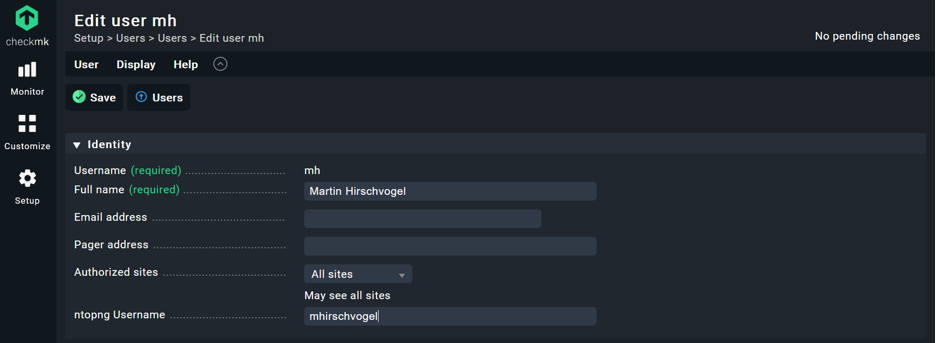
- Click on ‘Save’. You will return to the user overview.
- Accept the changes in Checkmk, so all these actions go into operation. Click on the highlighted field with the yellow exclamation point (!) in the top right corner. Click on ‘Activate on selected sites’.
This explicit activation for changes is a safety mechanism in Checkmk. All changes you are making in Checkmk need to be reviewed before they affect your monitoring. You must activate pending changes before they go into production.
Step 3: Check out the ntopgng integration in Checkmk
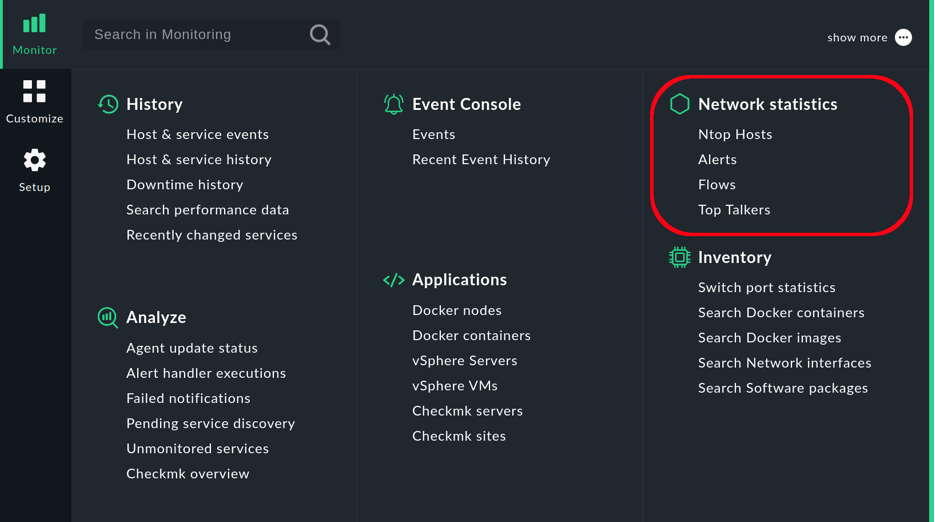
- Click on Monitor in the sidebar. If all has worked out, you should see a new topic named ‘Network statistics’ in Checkmk. This confirms that the integration is working.
Step 4: Add hosts to Checkmk
A major difference compared to network flow monitoring is the fact that you have to proactively add hosts to your infrastructure monitoring. In case your Checkmk monitoring environment already contains hosts communicating in your network, you can skip this step.
If you just installed Checkmk, you do not have any hosts in your Checkmk environment. Add hosts either by monitoring them via built-in interfaces such as SNMP or installing the Checkmk agent on the host. Checkmk has several features to add and manage a large number of hosts.
In this tutorial, I will show how to add a host to Checkmk through the user interface and use a device providing data via SNMP as an example.
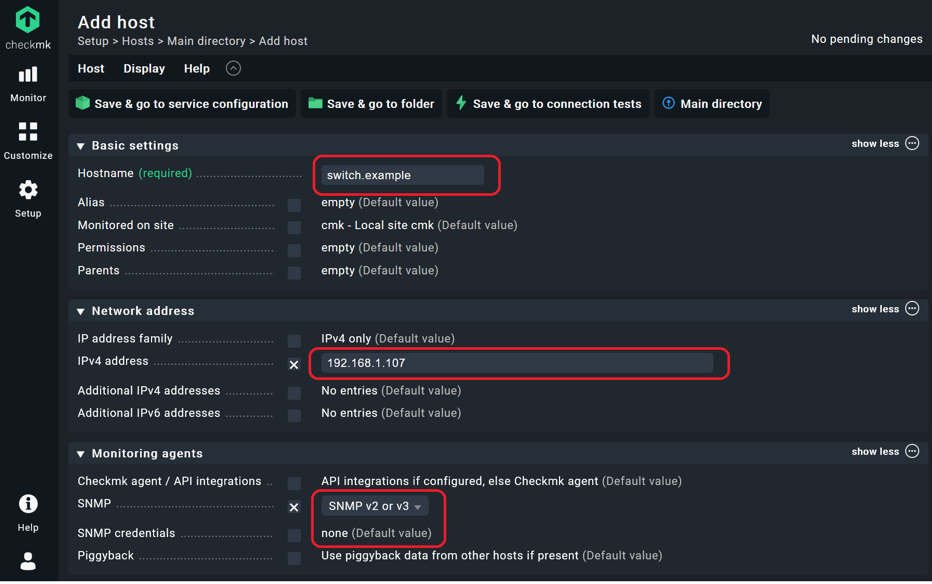
- Go to Setup -> Hosts, and click on ‘Add host’.
- Add the name of your host under ‘Hostname’. If the name of our host is not DNS resolvable, you need to add the IP address, as well.
- Because I want to use SNMP, I need to edit that under ‘Monitoring Agents’ in Checkmk. Activate the check box next to ‘SNMP‘ and pick your SNMP version.
- Checkmk assumes by default that your SNMP Community is ‘public’ because it is also the default on most SNMP devices. If that is the case, you can leave the box ‘SNMP credentials‘ unchecked. Otherwise, you have to check this box and add your SNMP credentials here.
- After adding all the information, click on ‘Save & go to service configuration’.
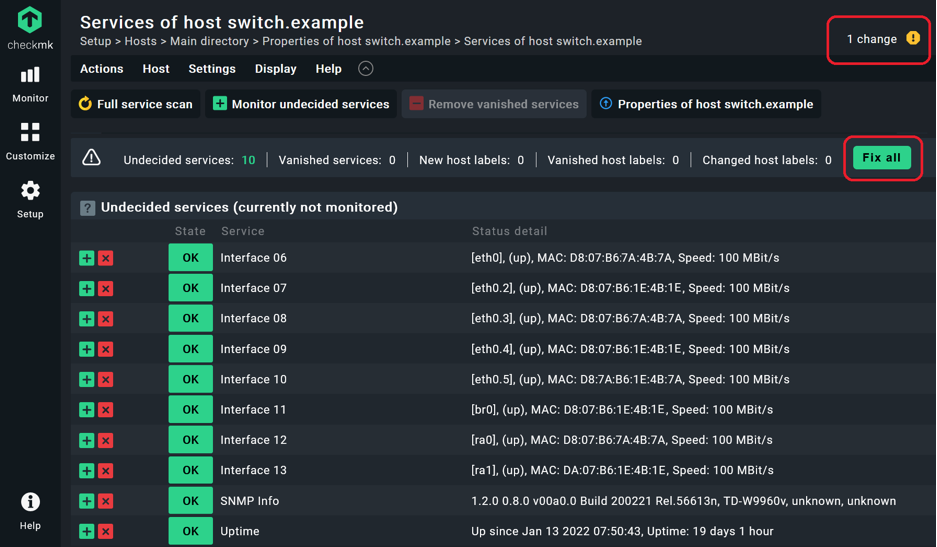
- Checkmk now automatically discovers any relevant monitoring services on that host. When you are monitoring with SNMP, Checkmk by default discovers all of the interfaces that are currently online, the uptime, and the SNMP Info check. Typically Checkmk will detect even more monitoring services automatically like CPU and memory utilization.
- Click on ‘Fix all’. This adds all detected services and host labels to your monitoring dashboard and removes services that have vanished.
- Again, accept the changes by clicking on the yellow exclamation point and ‘Activate on selected sites’. You added a host to Checkmk.
Step 5: Check your ntopng hosts in Checkmk
When you are done with adding hosts, you can check which hosts are set up in Checkmk and ntopng.
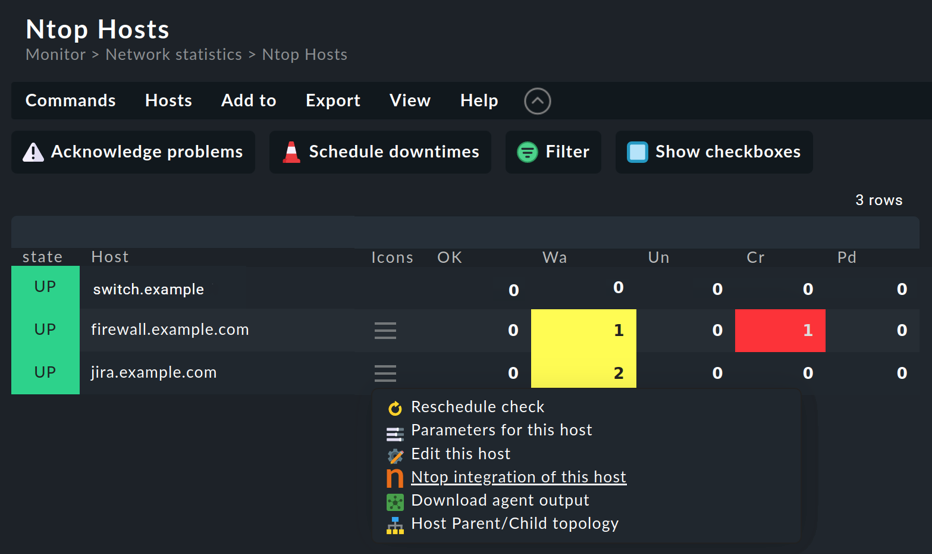
- Go to Monitor > Network statistics > Ntop Hosts.
- You should see an overview of all hosts that are monitored in Checkmk and also are visible in ntopng.
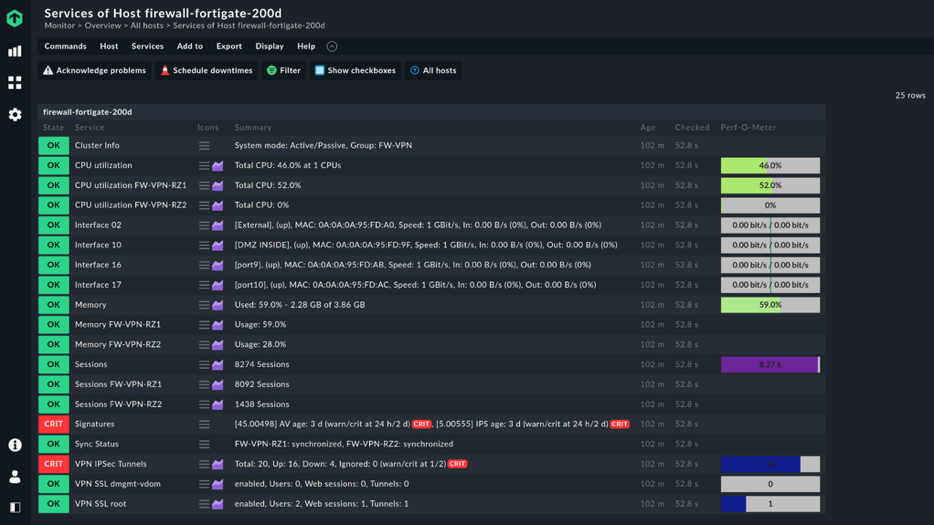
Besides my switch, I added two more hosts for which Checkmk received data from ntopng. You can inspect more details about a host by clicking on the entry ‘Ntopng integration of this host’ in the action menu. This menu is now also available on all other host views in Checkmk.
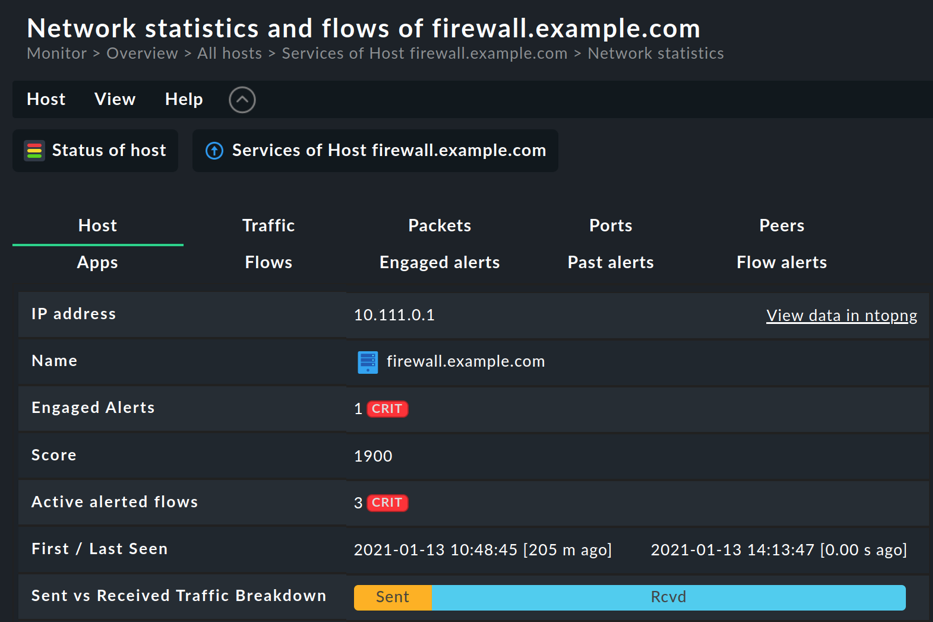
Opening the action menu item ‘Ntopng integration of this host’ will show the host-specific page ‘Network statistics and flows’ with several tabs for different perspectives. By default, Checkmk opens the ‘Host’ tab with basic information for the host and a summary of the most important details from the other tabs. You can now use the tabs to gain insights into your hosts and the way they communicate or you can click on ‘View data in ntopng’ to jump to this host in ntopng.
This is the end of this tutorial. You should now be able to use the ntop integration in Checkmk, and you should also know how to add hosts into Checkmk. That is just a start, of course. You find more details about the ntop integration in the chapter on the ntop integration in the Checkmk user guide. Checkmk supports bulk imports and has many more features. If you want to read more about the way Checkmk works in general, you can use the Checkmk beginner’s guide. You can also read more information about network monitoring with Checkmk.
Martin Hirschvogel, Director of Product
tribe29, the Checkmk company