ntopng has always supported multiple authentication methods to fit different environments: local accounts, LDAP, RADIUS, HTTP basic auth, etc. Now it also supports OpenID Connect (OIDC), bringing native Single Sign-on (SSO) support for any standards-compliant Identity Provider (IdP), including Keycloak, Okta, Auth0, Azure AD / Entra ID, Google Workspace, and more.
Why SSO?
Managing separate credentials for every tool in a network operations centre is a maintenance burden and a security risk. Passwords get reused, accounts get forgotten, and off-boarding a staff member means hunting down every application they had access to.
With SSO, your Identity Provider is the single source of truth. Users authenticate once, with Multi-Factor Authentication (MFA) if your IdP enforces it, and are granted access to ntopng same as every other integrated application, based on their group membership and attributes. When a user leaves, disabling their Identity Provider account is all that is needed.
How SSO Works
ntopng implements the Authorization Code Flow, the recommended OAuth2 flow for server-side web applications. The token exchange happens entirely between the ntopng backend and the IdP. Credentials and tokens are never exposed to the browser.
Browser                  ntopng                   Identity Provider
  │                         │                             │
  │  Click "Login with SSO" │                             │
  │────────────────────────>│                             │
  │                         │ generate state + nonce      │
  │  302 → IdP login page   │ (stored in Redis, 10 min)   │
  │<────────────────────────│                             │
  │  Authenticate at IdP    -────────────────────────────>│
  │  (password, MFA, etc.)  │                             │
  │<──────────────────────────────────────────────────────│
  │  302 → /oidc_callback   │                             │
  │────────────────────────>│                             │
  │                         │ exchange code for tokens ──>│
  │                         │ validate JWT signature      │
  │                         │ check iss, aud, exp, nonce  │
  │                         │ map claims → ntopng user    │
  │  302 → original page    │                             │
  │<────────────────────────│                             │
After the Identity Provider validates the user and returns a signed JWT (ID token), ntopng infers the local username from the token claims in this order:
preferred_usernameemailsub
Admin vs. unprivileged role is determined by inspecting groups. If they contain the configured admin group name, the user is granted the administrator role, otherwise they are treated as an unprivileged user.
Network access restrictions (as well as other capabilities) for unprivileged users can be pushed directly from the Identity Provider via custom attributes. When present, ntopng limits the user visibility to the listed subnets, thus no manual per-user configuration inside ntopng is required. We show how to set this up in the Keycloak example below.
Auto-create users: when enabled, ntopng automatically creates a local account on the first successful OIDC login. When disabled, the account must be pre-provisioned manually, giving administrators explicit control over who can access ntopng even if they authenticate successfully at the Identity Provider.
Step-by-Step Example: Keycloak + ntopng
Let’s see how to configure a local Keycloak instance as the Identity Provider and point ntopng at it. In this example we assume that Keycloak is running on a host with IP 192.168.2.1, while ntopng is running on another host with IP 192.168.2.2.
1. Run Keycloak
We use a docker image for running Keycloak, which is really straightforward:
docker run -p 8080:8080 \
  -e KEYCLOAK_ADMIN=admin \
  -e KEYCLOAK_ADMIN_PASSWORD=admin \
  quay.io/keycloak/keycloak:latest start-dev
Open http://192.168.2.1:8080 and log in with admin / admin.
2. Create a Realm
In the top-left dropdown choose Manage realms → Create realm.
- Realm name:
ntopng-realm
Click Create.
3. Create a Client
Navigate to Clients → Create client.
- Client type: OpenID Connect
- Client ID:
ntopng
Click Next.
- Client authentication: On
- Authentication flow → Standard flow: On
Click Next.
- Valid redirect URIs:
http://192.168.2.2:3000/* - Web origins:
*
Click Save.
4. Copy the Client Secret
Go to Clients → ntopng → Credentials.
Copy the generated Client Secret (e.g. naH5MpJ6Lgqy9jnS7YiFCwZaNlXNwbgT). You will need this when configuring ntopng.
5. Create the Admin Group and Add a Groups Mapper
Go to Groups → Create group.
- Name:
admin
Now add the mapper so the groups claim appears in the ID token. Navigate to:
Clients → ntopng → Client scopes → ntopng-dedicated → Configure a new mapper → By configuration → Group Membership
| Name | groups |
| Token Claim Name | groups |
| Full group path | Off |
| Add to ID token | On |
| Add to access token | On |
| Add to userinfo | On |
Click Save.
6. Create a User
Go to Users → Create new user.
| Username | Alfredo |
| Email verified | On |
| Join groups | admin (Administrator Users Only) |
Click Create, then set a password under Credentials → Set password.
| Password | <your password> |
| Temporary | Off |
7. Restrict Network Access (Unprivileged Users Only)
This step shows how to push network-level access restrictions directly from Keycloak into ntopng, without any per-user configuration inside ntopng itself.
Create a custom user attribute. Go to Realm Settings → User Profile → Create attribute:
| Attribute Name | allowed-networks |
| Display name | Allowed Networks |
| Multivalues | On |
Assign networks to the user. Go to Users → Alfredo → Attributes and add allowed-networks values:
192.168.1.0/24
192.168.2.0/24
Expose the attribute as a JWT claim. Navigate to:
Clients → ntopng → Client scopes → ntopng-dedicated → Configure a new mapper → User Attribute
| Name | ntopng networks |
| User Attribute | allowed-networks |
| Token Claim Name | allowed_networks |
| Claim JSON Type | String |
| Add to ID token | On |
| Add to access token | On |
| Add to userinfo | On |
| Multivalues | On |
Click Save. When ntopng reads the allowed_networks claim from the JWT it will automatically restrict the user’s visibility to those subnets.
8. Configure ntopng
Log in to ntopng as administrator and go to Settings → Preferences → User Authentication.
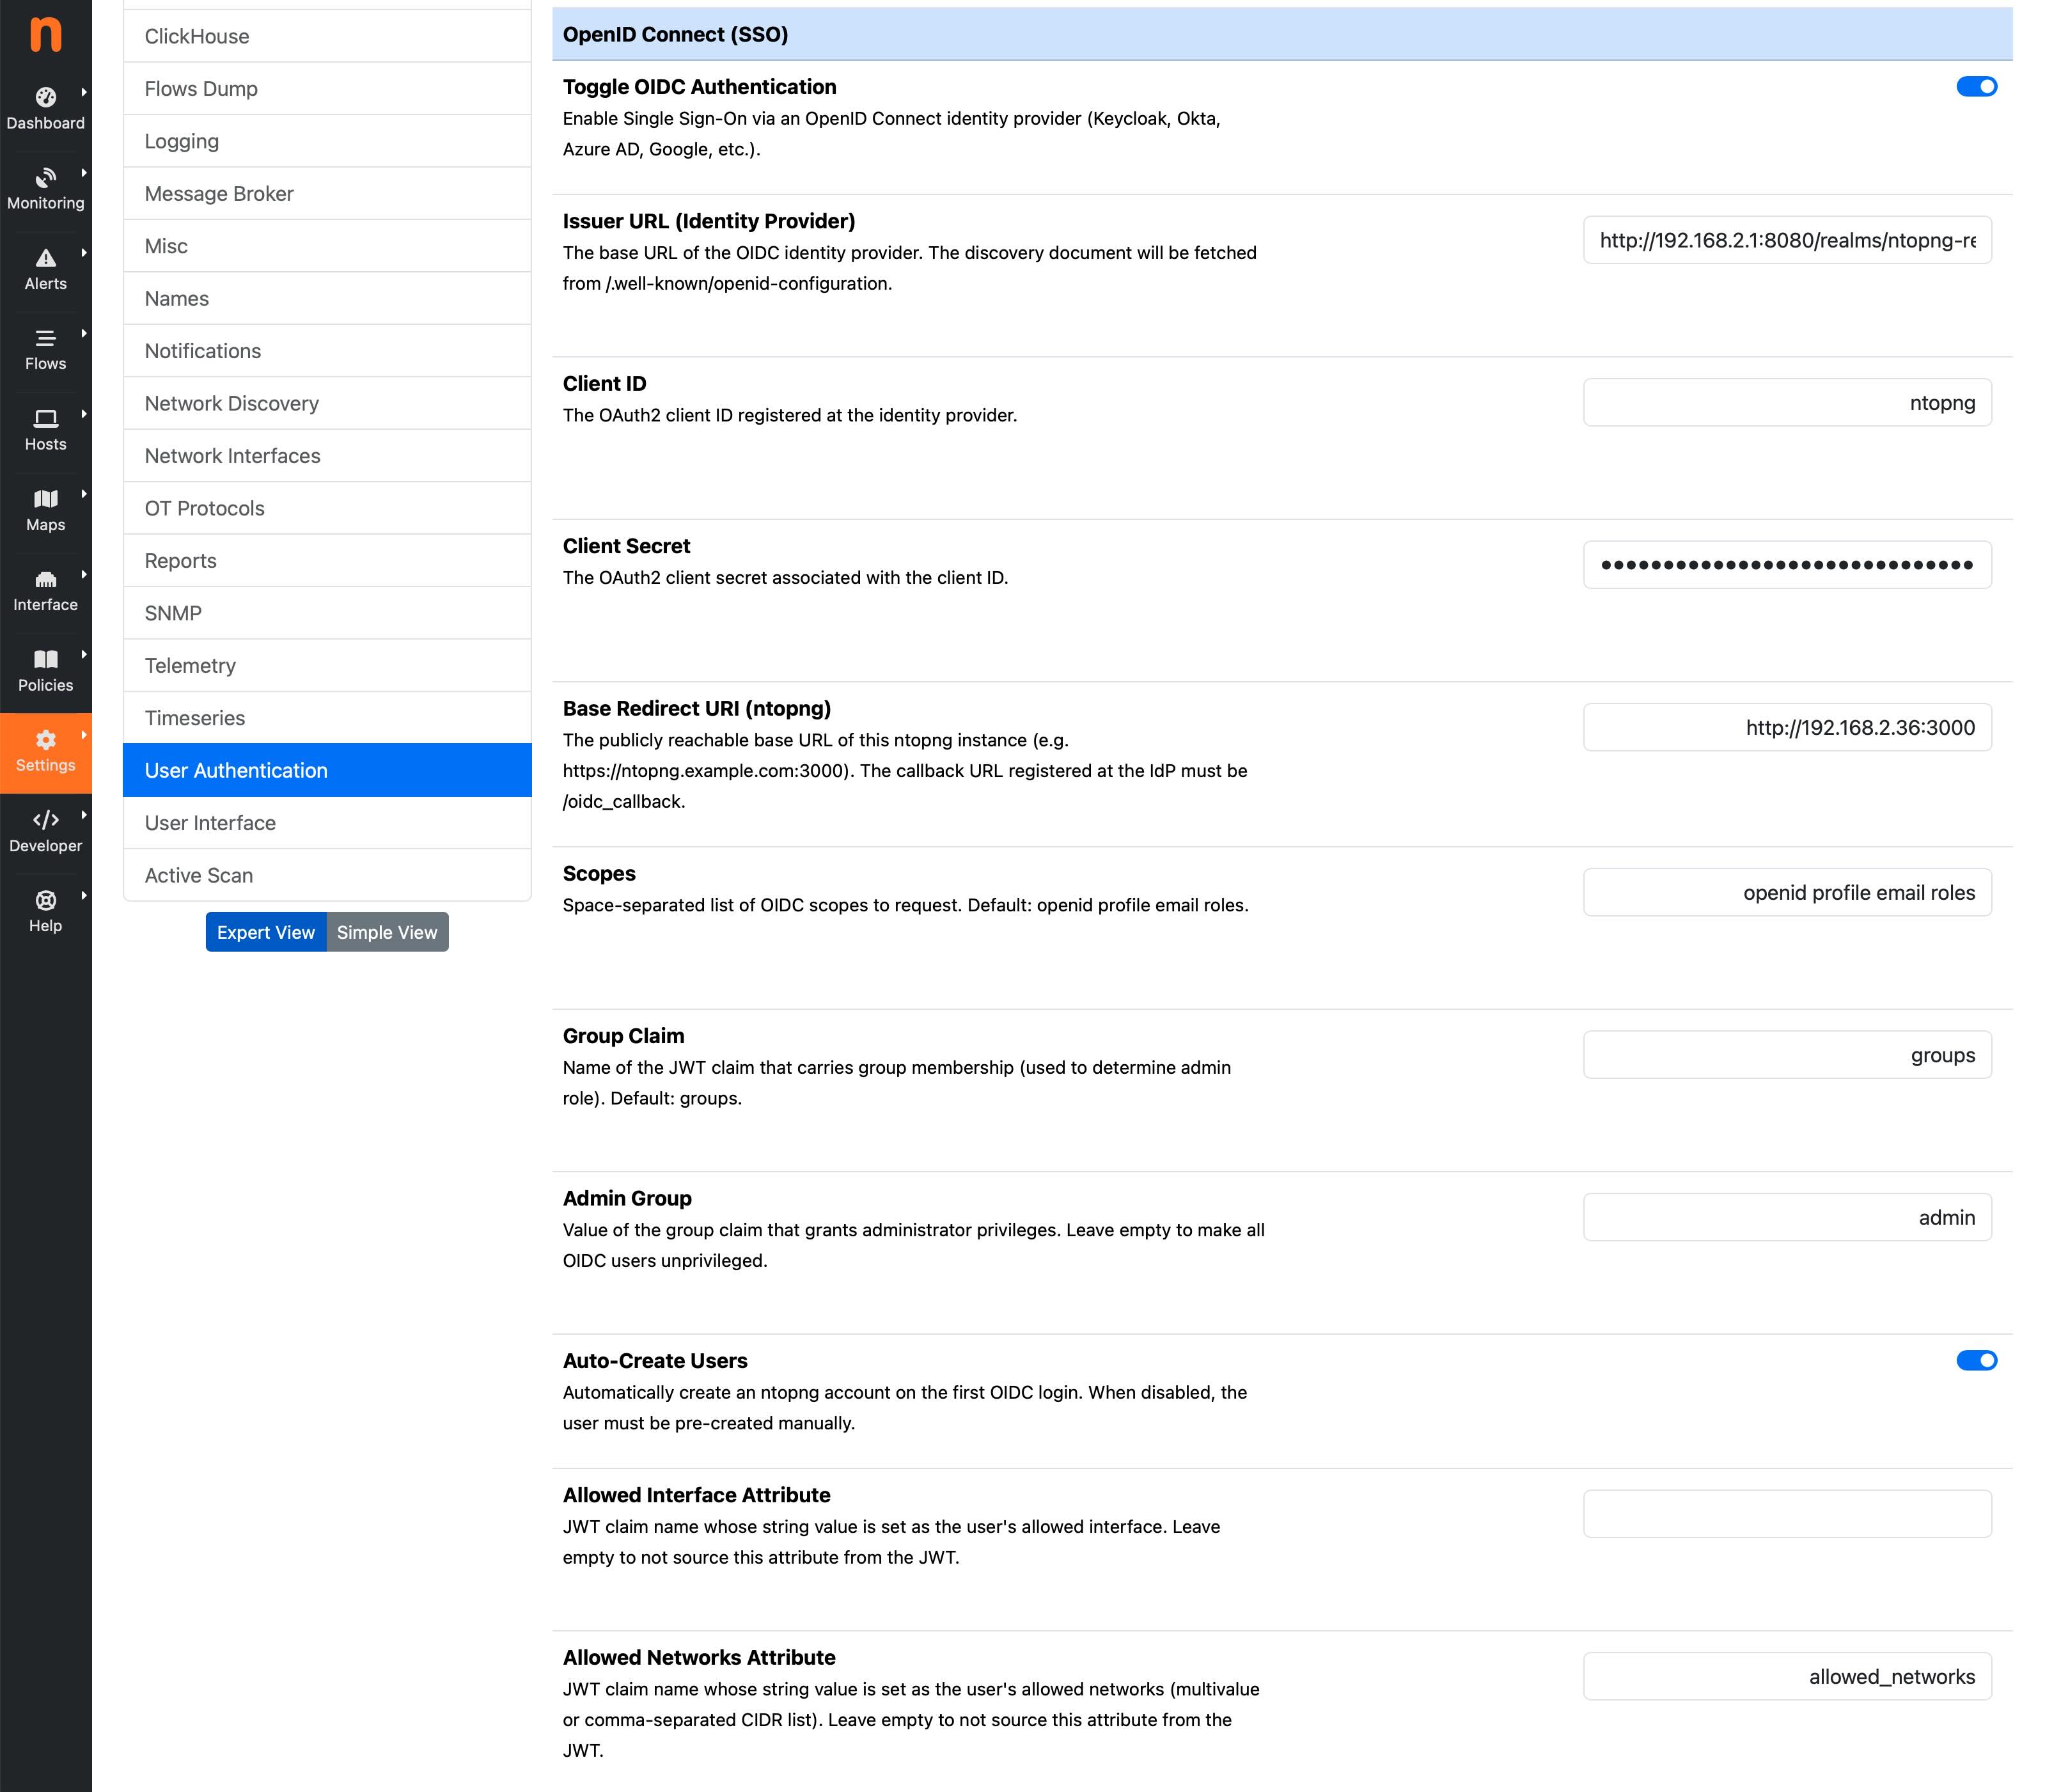
Enable OpenID Connect (OIDC) / SSO Authentication and fill in the fields:
| Issuer URL | http://192.168.2.1:8080/realms/ntopng-realm |
| Client ID | ntopng |
| Client Secret | naH5MpJ6Lgqy9jnS7YiFCwZaNlXNwbgT |
| Base Redirect URI | http://192.168.2.2:3000 |
| Scopes | openid profile email roles |
| Group Claim | groups |
| Admin Group | admin |
| Auto-Create Users | On |
| Allowed Networks Attribute | allowed_networks |
Click Save. ntopng will immediately fetch the OIDC discovery document from http://192.168.2.1:8080/realms/ntopng-realm/.well-known/openid-configuration and cache the token and JWKS endpoints for one hour.
Testing the Login
Open http://192.168.2.2:3000 in a browser. The login page now shows a “Login with SSO” button alongside the usual username/password form.
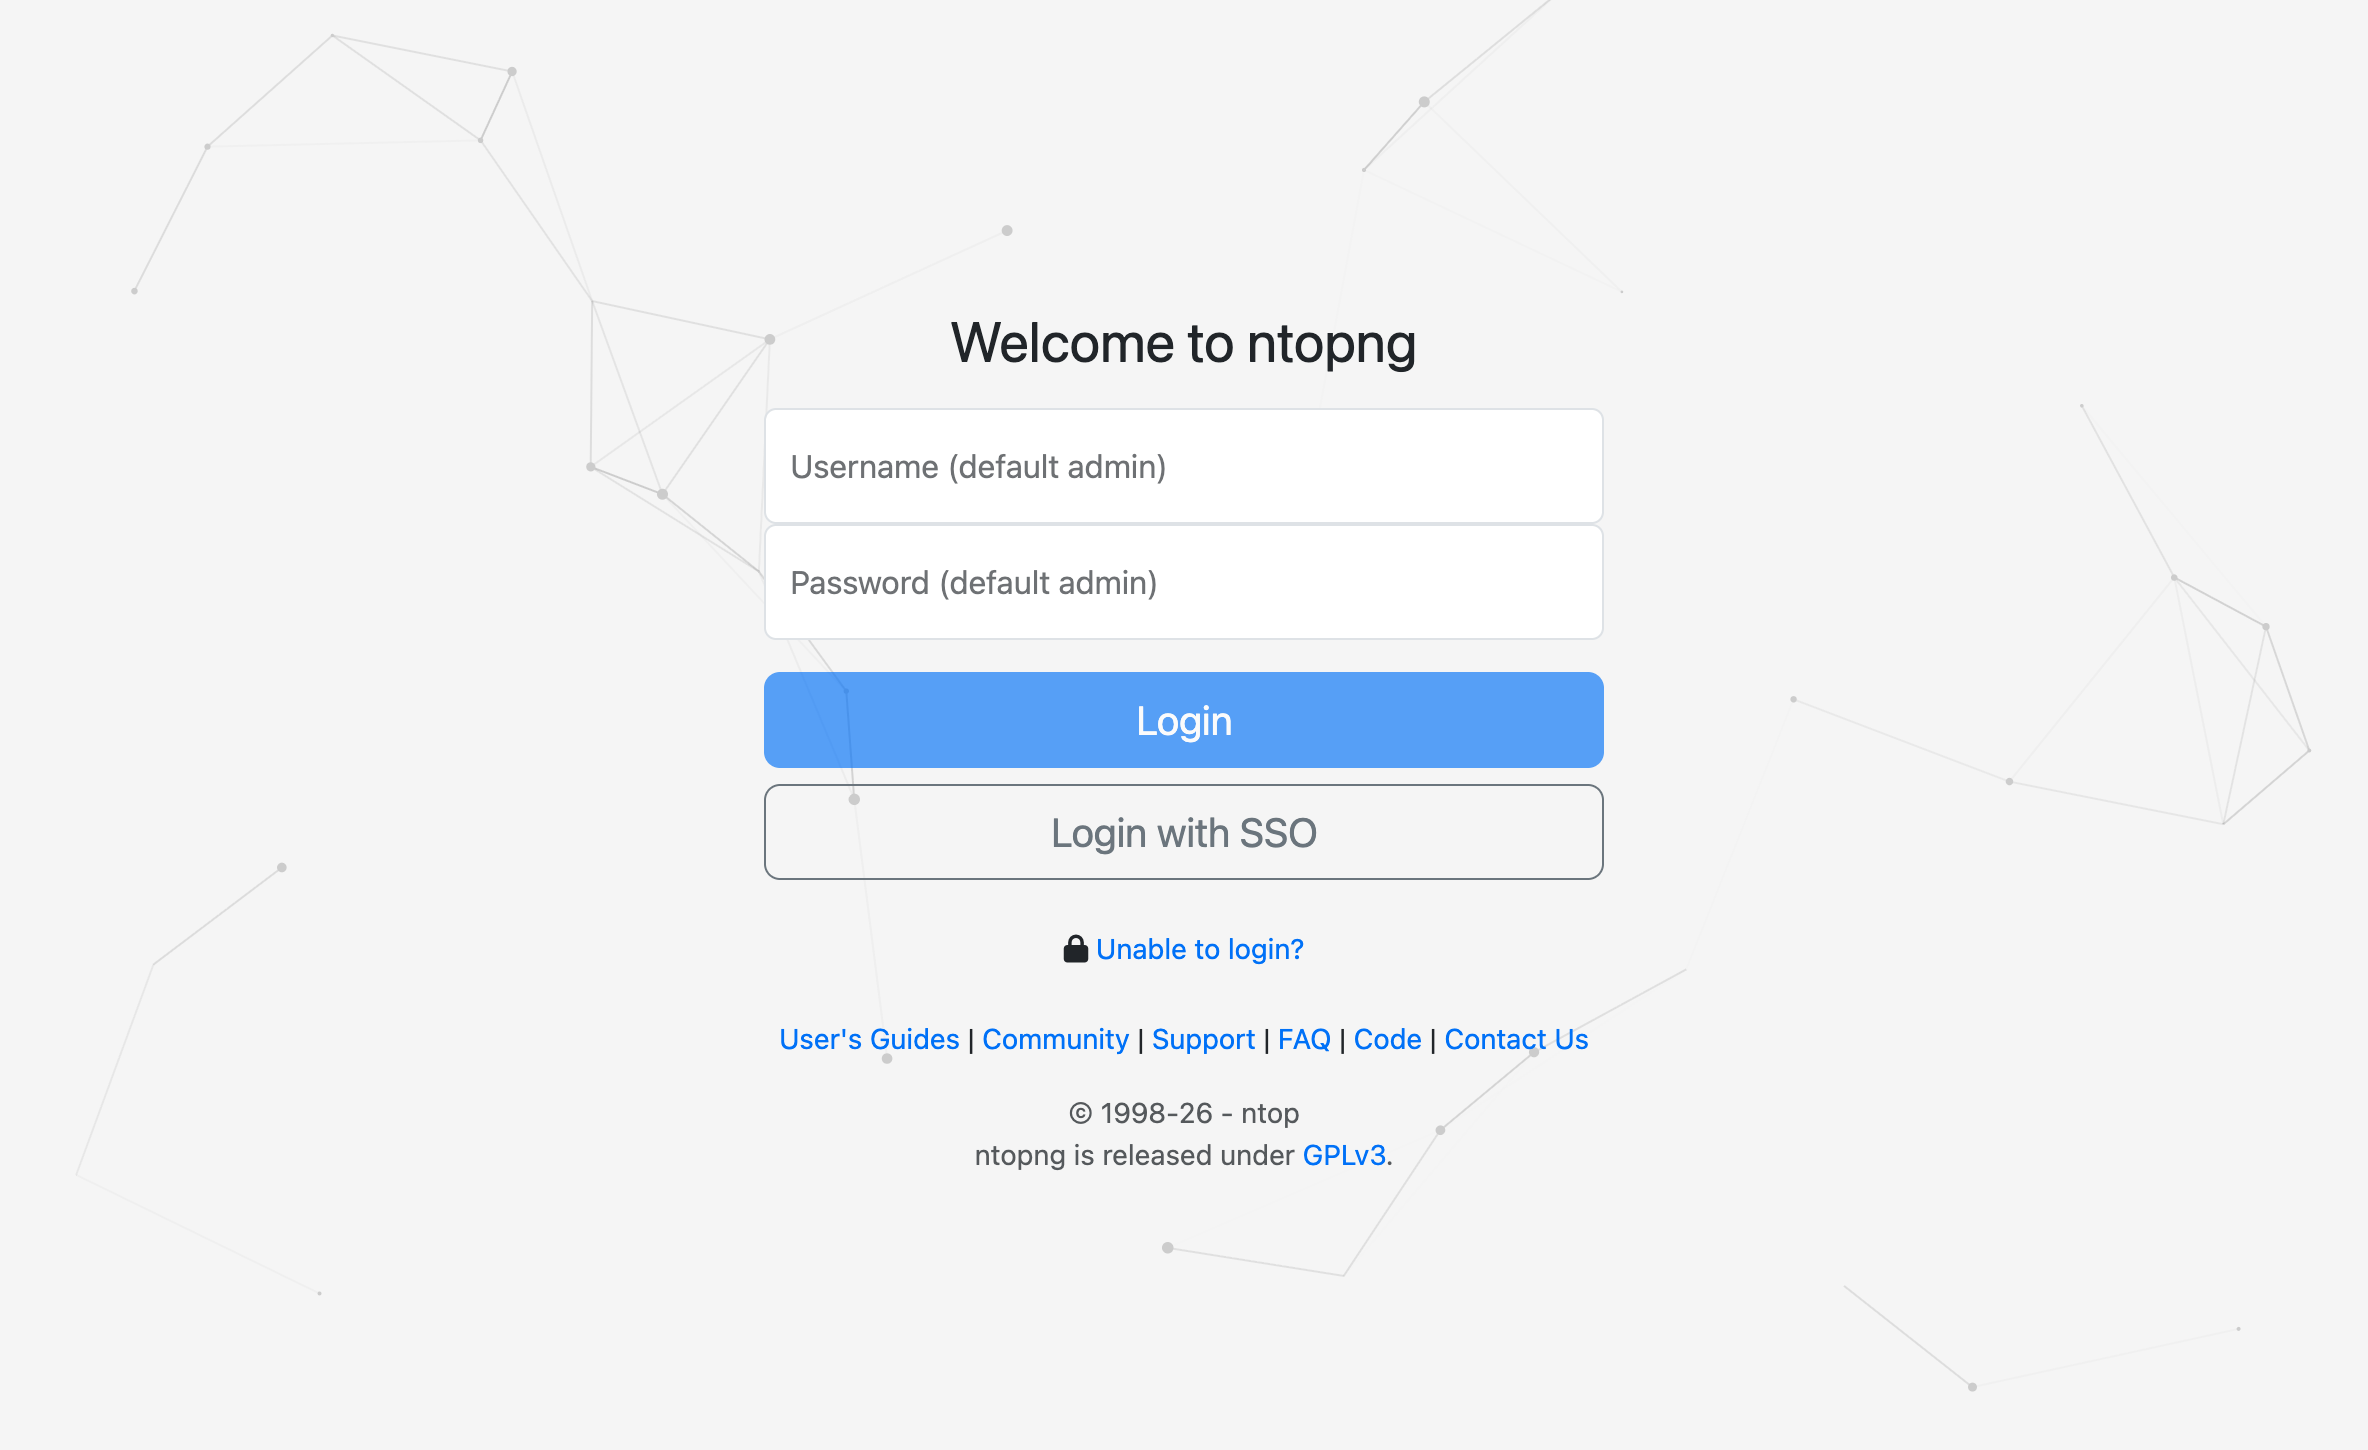
Click Login with SSO. The browser is redirected to the Keycloak login page for the ntopng-realm realm. After authenticating with the credentials created in step 6, Keycloak redirects back to ntopng.
ntopng will then:
- Verify the JWT signature using Keycloak public keys.
- Derive the username from the
preferred_usernameclaim. - Check the
groupsclaim: ifadminis present, grant the administrator role. - Auto-create the local account (because Auto-Create Users is enabled).
- Redirect to the originally requested page.
The user is now logged into ntopng, with no ntopng-specific password ever set.
Further configuration details are documented in the ntopng manual under Settings → Preferences → User Authentication → OpenID Connect (OIDC) / SSO Authentication.
Enjoy!