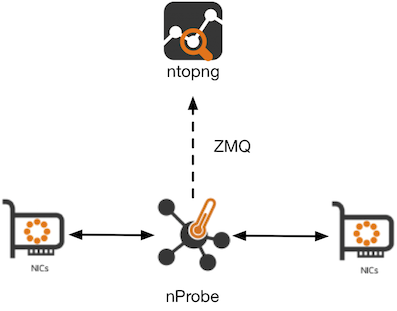
This is to introduce a new nProbe feature that brings IPS (Intrusion Prevention System) support via nDPI for Linux and FreeBSD (including OPNsense and pfSense). As shown in the picture below, nProbe acts as a transparent bridge (with kernel offload) for applying pass/drop/shape rules to the forwarded traffic. Our goal is to combine the power of DPI and nDPI cybersecurity features to all nProbe users.
When deployed on a firewall/gateway (including OPNsense/pfSense), nProbe can both monitor and apply policies to monitored traffic. Typical use case include (but are not limited to):
- Drop unwanted protocols (e.g. Tor).
- Block “unclean” traffic (e.g. TLS traffic with self-signed certificates, HTTP traffic with suspicious SQL injection).
- Shape protocols that take a lot of bandwidth (e.g. BitTorrent).
- Prevent specific hosts from being accessed by specific countries or region (e.g. my core servers can be accessed only from USA).
- Drop traffic from/to hosts that have been marked as malware.
- Assign fair bandwidth (Linux only) to protocols by preventing specific protocols (e.g. Netflix or YouTube) to monopolize the bandwidth.
- Block traffic from advertisement servers (similar to PiHole) or blacklisted hosts.
You can use ntopng (via the usual ZMQ interface) to monitor and report nProbe policed traffic. As you can see in the picture below dropped traffic is depicted with a strikethrough line.

IPS Policy Configuration
In order to enable the IPS mode, you need to start nProbe with a new parameter –ips-mode (e.g. –ips-mode ips_rules.txt) that specifies a configuration file where you can specify your policies. Example:
# Pool definition
{"pool":{"id":1,"name":"my pool 1","ip": [ "131.114.0.0/16"], "mac": [ ]},"policy": {"id": 1} }
{"pool":{"id":2,"name":"my pool 2","ip": [ "192.168.1.0/24"], "mac": [ ]},"policy": {"id": 2} }

# Continents: Africa / Asia-Pacific / Europe / North America / South America

# Policy definition
{"policy":{"id":0,"name":"root policy rule", "default_marker": "pass", "markers": { "countries": { "IT": "pass", "CN": "drop", "US": "pass" } } } }
{"policy":{"id":1,"root":0,"name":"my rule 1", "markers": { "categories": { "Network": 7, "Download-FileTransfer-FileSharing": 8, "DataTransfer": 8, "VPN": 8, "Video": 9, "Music": 9, "Streaming": 9, "Media": 9 }, "protocols": { "DNS": "drop" }, "countries": { "IT": "drop", "CN": "drop", "US": "pass" }, "asn" : { }, "continents" : { "Asia" : "drop"} } , "default_marker": "pass"  } }
{"policy":{"id":2,"root":0,"name":"my rule 2", "markers": { "categories": { "Video": "pass" }, "flow_risk": { "risks": [12], "marker": "drop" }, "protocols": { "DNS": "drop" }, "countries": { "IT": "pass", "US": "pass" }, "asn" : { "34984" : "drop" } }, "default_marker": "pass"  } }
#{"policy":{"id":2,"root":0,"name":"my rule 2", "markers": { "categories": { "Video": "drop" }, "protocols": { "DNS": "drop" }, "countries": { "IT": "pass", "US": "pass" } }, "default_marker": "pass"  } }

### GeoIP ###

{ "geoip": { "asn": ".GeoLite2-ASN.mmdb", "city": "GeoLite2-City.mmdb" }}
As you can see there are two main components
- Pool: list of IP and MAC addresses to which you want to apply a specific policy.
- Policy: traffic policy rule that allows you to define how to threat the traffic bound to a specific pool.
You can define multiple pools and policies for applying granular policies to selected hosts.
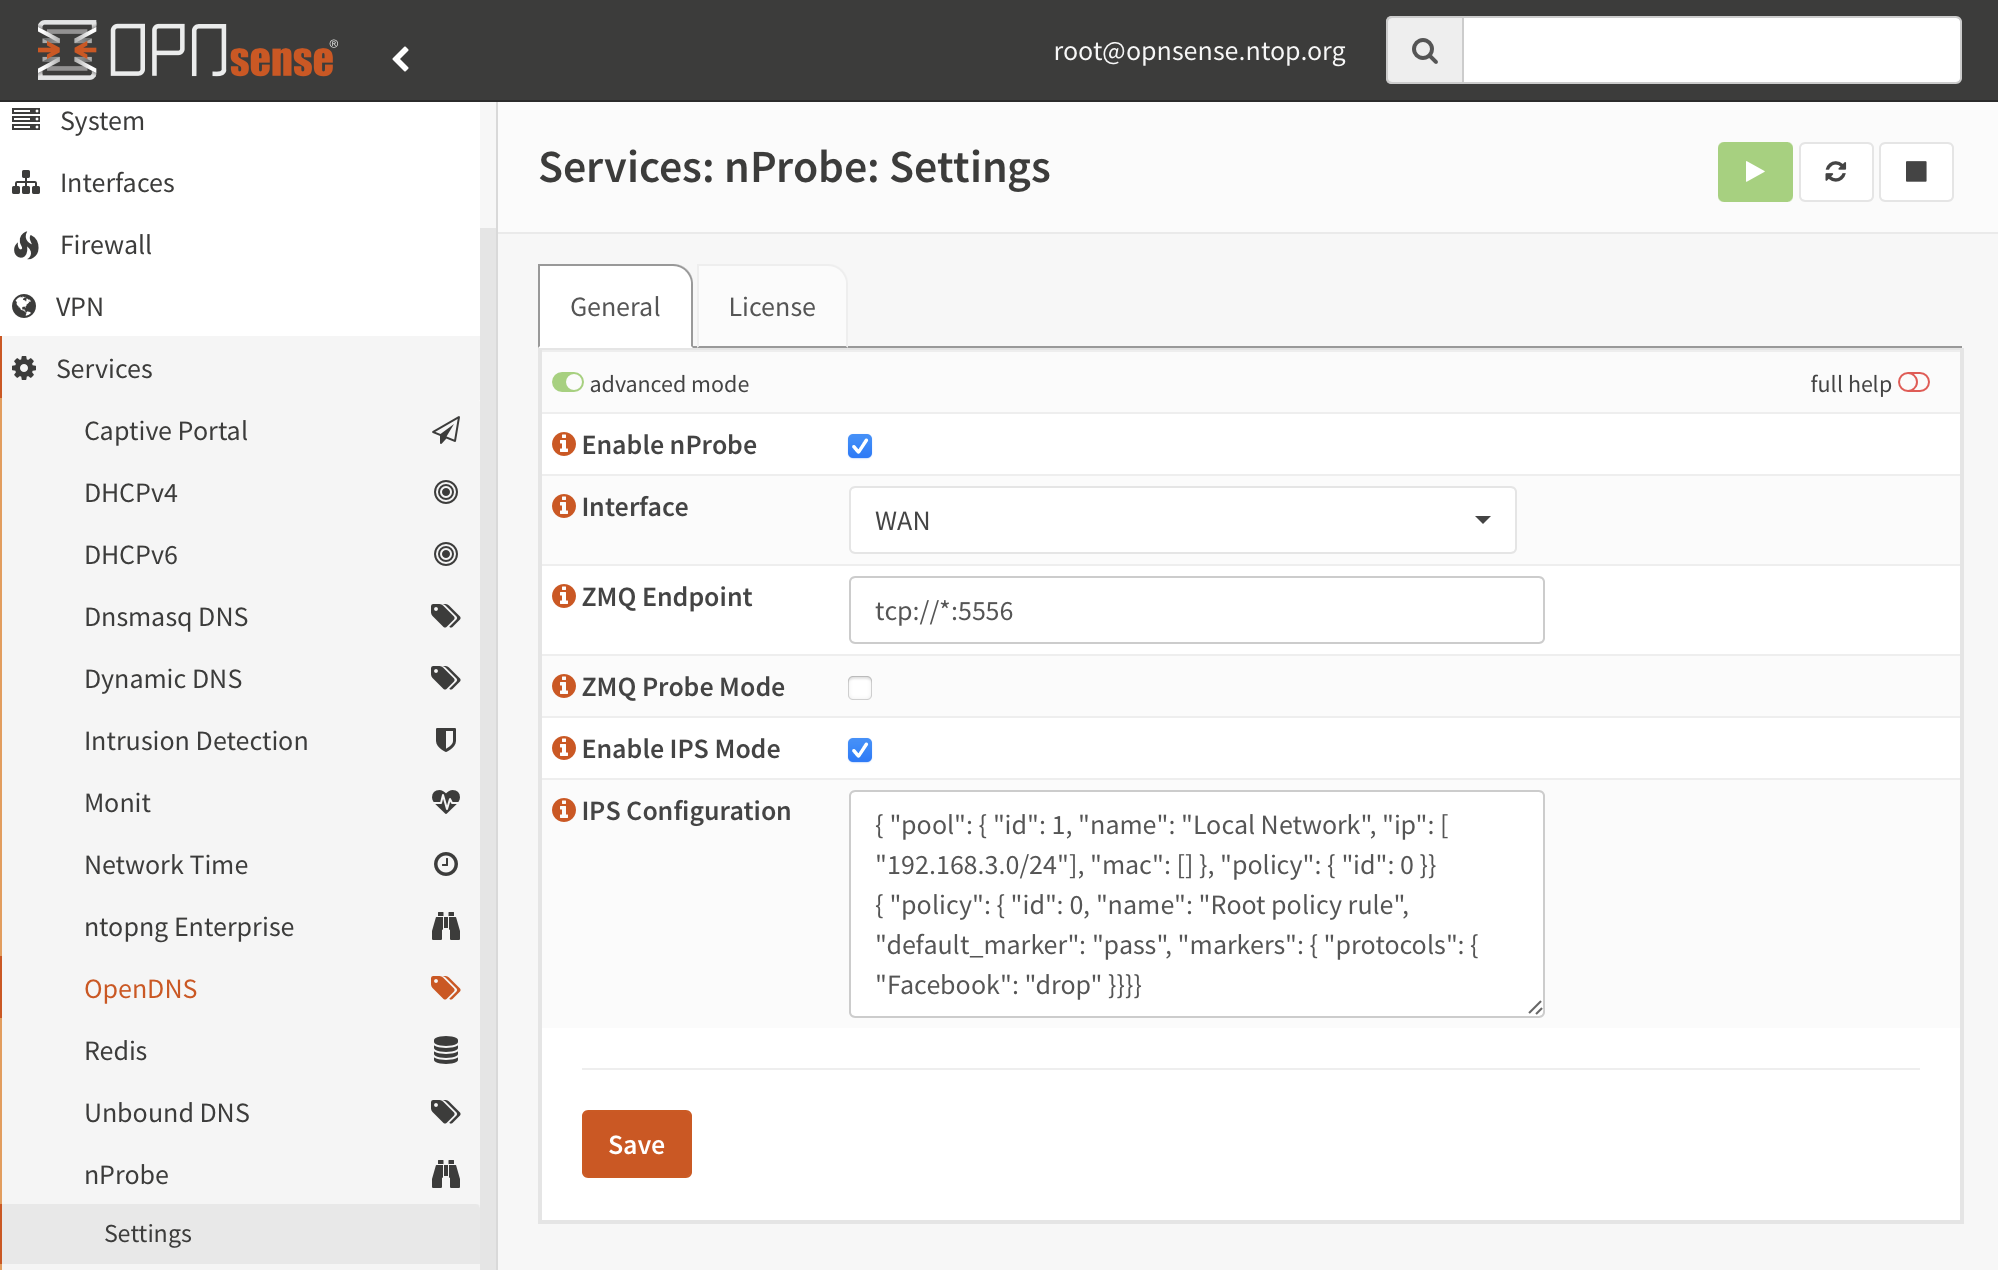
IPS Configuration
On Linux you need to configure NetFilter before enabling the IPS mode, whereas on FreeBSD this not necessary. On OPNsense you can enable the IPS configuration from the user interface.
You can read more about IPS configuration in the nProbe user’s guide.
IPS Performance
Below you can find the expected performance of the IPS Mode on both Linux and FreeBSD using a low-end computer or mid-range PC. As you can see the IPS performance is affected by the way the operating system enables packet bridging (see nProbe user’s guide for details).
| Device | Vanilla Linux Bridge Only | Linux nProbe IPS | Vanilla FreeBSD Bridge Only | FreeBSD nProbe IPS |
|---|---|---|---|---|
| PC Engines APU2 | 550 Mbps | 600 Mbps | 1 Gbps | 120 Mbps |
| Intel E3 | 10 Gbps / 1.8 Mpps | 10 Gbps / 2.4 Mpps |
Tests have been performed on the following conditions:
- Linux IPS mode has been tested with 4 queues using a NetFilter configuration named “kernel marker bypass”. This explains why nProbe in IPS mode is faster on a low-end box that the vanilla bridge.
- Under FreeBSD there is no kernel marker bypass mode, hence the performance decrease is severe when using nProbe as bridging is performed in user-space.
IPS Availability
The nProbe IPS mode is available free of charge (no additional license required) as part of nProbe, and it does not speak with cloud/third-party services in order to operate (i.e. your traffic is safe and not shared with anybody as other products do). Currently, the IPS mode is available in the nProbe nightly builds and it will be merge in the next stable release. The number of pools/policies depend on the nProbe version as described in the nProbe product page,
What’s Next?
This work is not yet fully completed as we’re still developing two important missing pieces that will make this work even more effective:
- Add the ability to configure nProbe IPS policies from ntopng in a simple and user-friendly way.
- [Linux] When using the kernel marker bypass mode, add the ability to produce flow information also for flows that are bridged in kernel.
Stay tuned for these news, and enjoy !