In the first post of this series (part 1) we described how to build a 2×10 Gbit continuous packet recorder using n2disk and PF_RING, in the second post (part 2) we described what hardware is required to scale from 10 Gbit to 100 Gbit. One more year has past now and we matured more experience with 100 Gbit recording, it’s time to refresh the previous posts and share more information about the new capture and storage technologies and configurations in order to build a recorder able to dump 100+ Gbit line-rate small-packets sustained traffic.
For those reading about this topic for the first time, a continuous packet recorder is a device that captures raw traffic to disk continuously, similar to a CVR camera, providing a window into network history. This allows you, whenever a network event happens, to go back in time and analyse traffic up to the raw packet as it appeared on the wire (including headers and payload) to find what exactly caused a specific issue.
With n2disk, which is part of the ntop suite, it is possible to build such device and dump traffic using the standard PCAP format. Furthermore, by leveraging on the PF_RING acceleration, n2disk is able to capture, index and dump traffic from 1/10/100 Gbit links with no packet loss in any traffic condition. This year we released a new n2disk stable version 3.4, that besides adding new interesting features (including the ability to filter traffic based on the L7 application protocol), introduced major performance optimizations when running on top of FPGA-based NICs.
In this post we will focus on 100 Gbit recording, describing a hardware and software configuration that our users are successfully using in production environments.
Hardware Specs
Network Card
As already discussed in the previous post n2disk is able to capture traffic from many adapters thanks to the abstraction layer provided by the PF_RING modules. Based on the speed and features we need (and our budget) we can decide to go for a commodity adapter (e.g. Intel) or a specialised FPGA adapter (e.g. Napatech, Silicom/Fiberblaze).
There are a few commodity adapters with 100 Gbit connectivity on the market, however they are usually not able to cope with full 100 Gbit throughput in any traffic condition (e.g. small packets) even using accelerated drivers, when it comes to dump traffic to disk. The main reason is that in this case we cannot use technologies like RSS to spread the load across multiple streams, as this would shuffle packets (coming from different streams) to disk, and we need to preserve packet order to provide evidence of a network event. Please note that using multiple streams is still an option if we have a way for sorting packets (e.g. hardware timestamps with high precision) which is usually not the case with commodity adapters.
FPGA adapters provide support for moving packets in big chunks, delivering high throughput to applications like n2disk, without the need of using multiple streams in most cases (in our experience n2disk is able to handle up to ~50 Gbps with a single stream). In this post we will use the Napatech NT200A02 adapter as reference for the configuration, however other options are also supported like the Silicom/Fiberblaze.
Storage
When it comes to select a fast storage, the word “Raid” immediately jumps to our mind. A good Raid controller (e.g. with 2 GB of onboard buffer) with a few disks in a Raid 0 configuration can increase the I/O throughput up to 40+ Gbps. However this is not enough to handle 100 Gbps. If we need quite some data retention time, and rack space is not a problem, we can probably use a few Raid controllers and many HDD or SSD disks to distribute the load and reach the desired throughput.
A better option could be using NVMe disks. Those disks are fast SSDs directly connected to the PCIe bus. Since they are fast, they do not even require a Raid controller (actually a standard SATA/SAS controller cannot drive them) and it is possible to leverage on the multithreaded dump capability of n2disk to directly write in parallel to many of them and dramatically increase the dump throughput.
The throughput we’ve been able to achieve with n2disk using Intel NVMe disks from the P4500/P4600 series is ~20 Gbps per disk. This means that 8 disks are enough for recording traffic at 100 Gbps. Please make sure that you select write-intensive disks that guarantee enough endurance time.
CPU
FPGA adapters are able to aggregate traffic in hardware and distribute the load across multiple streams. As said before, n2disk is able to handle up to ~50 Gbps with a single capture thread/core and a single data stream. If we use a 3+ Ghz Xeon Gold CPU, at 50 Gbps n2disk requires 3/4 cores for indexing traffic. One more core is required for the threads dumping traffic to disk, for a total of 6 cores.
If we want to handle 100 Gbps traffic, we should use 2 streams, with one n2disk instance each, thus a 3+ Ghz Xeon Gold with at least 12 cores is required. An Intel Xeon Gold 6246 is an example as minimum requirement at this speed. If you go for a NUMA system (multiple CPUs) please pay attention to the CPU affinity as already discussed in the previous posts! Please also make sure you configure the system with enough memory modules to use all memory channels (check the CPU specs for this) and with the maximum supported frequency.
Software Configuration
Data Stream Configuration
In order to run n2disk on Napatech or other FPGAs with the best performance, the adapter need to be properly configured. Support for chunk mode, PCAP format, nanosecond timestamps, need to be enabled in the configuration the under /opt/napatech3/config/ntservice.ini as described in the n2disk user’s guide. Please find below the parameters that you usually need to change:
[System]
TimestampFormat = PCAP_NS
[Adapter0]
HostBufferSegmentSizeRx = 4
HostBuffersRx = [4,128,0]
MaxFrameSize = 1518
PacketDescriptor = PCAP
If a single data stream is enough, no additional configuration is required as it is possible to capture directly from an interface (e.g. nt:0 for port 0). If a single data stream is not enough as the traffic throughput exceeds 50 Gbps, multiple streams need to be configured using the ntpl tool as in the example below. In the example below traffic is load-balanced to two streams using a 5-tuple hash function. Each stream can be selected by capturing from nt:stream<id> (e.g. nt:stream0 for stream 0).
/opt/napatech3/bin/ntpl -e "Delete=All"
/opt/napatech3/bin/ntpl -e "HashMode = Hash5TupleSorted"
/opt/napatech3/bin/ntpl -e "Setup[NUMANode=0]=Streamid==(0..1)"
/opt/napatech3/bin/ntpl -e "Assign[streamid=(0..1)] = All"
n2disk Configuration
A good n2disk setup is also really important in order to achieve the best dump performance. The tuning section of the n2disk user’s guide contains basic guidelines for properly configuring dump settings, CPU core affinity, indexing, etc.
In this example we are capturing 100 Gbps traffic divided into two streams by means of two n2disk instances, which should handle a maximum throughput of 50 Gbps each. Traffic is stored in PCAP files across multiple NVMe disks in round-robin. As we’ve seen before, each NVMe disk has a max sustained IO throughput of 20 Gbps, thus 4 disks for each n2disk instance will be used.

Please note that dumped traffic can be later on extracted seamlessly from all NVMe disks by selecting all timelines generated by the n2disk instances as data source in the npcapextract extraction tool. Please find below the configuration file for the first n2disk instance, with some comment describing what each instance is supposed to do.
# Capture interface
-i=nt:stream0
# Disk space limit
--disk-limit=80%
# Storages (NVMe disks 1, 2, 3, 4)
-o=/storage1
-o=/storage2
-o=/storage3
-o=/storage4
# Max PCAP file size
-p=2048
# In-memory buffer size
-b=16384
# Chunk size
-C=16384
# Index and timeline
-A=/storage1
-I
-Z
# Capture thread core affinity
-c=0
# Writer thread core affinity
-w=22,22,22,22
# Indexing threads core affinity
-z=4,6,8,10
Please find below the configuration file for the second n2disk instance, which is similar to the previous one. It is important here to pay attention to the CPU affinity to avoid using the same cores twice (including logical cores using hyperthreading) affecting the performance.
-i=nt:stream1
--disk-limit=80%
-o=/storage5
-o=/storage6
-o=/storage7
-o=/storage8
-p=2048
-b=16384
-C=16384
-A=/storage5
-I
-Z
-c=2
-w=46,46,46,46
-z=12,14,16,18
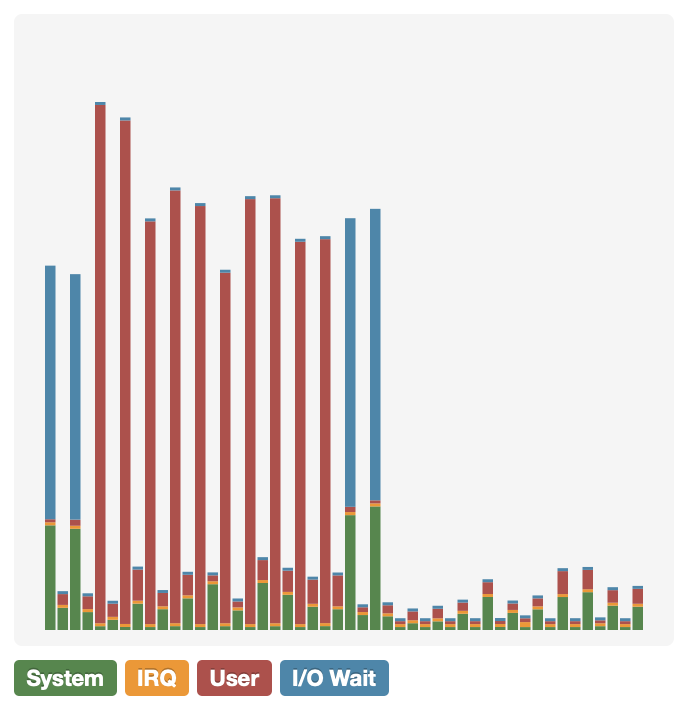
At this point we are ready to start the two n2disk instances. The chart below shows the CPU cores utilisation while capturing, indexing and dumping sustained 100 Gbps traffic (64-byte packets) continuously.
Now you have all the ingredients to build your 100 Gbps traffic recorder.
Enjoy!